


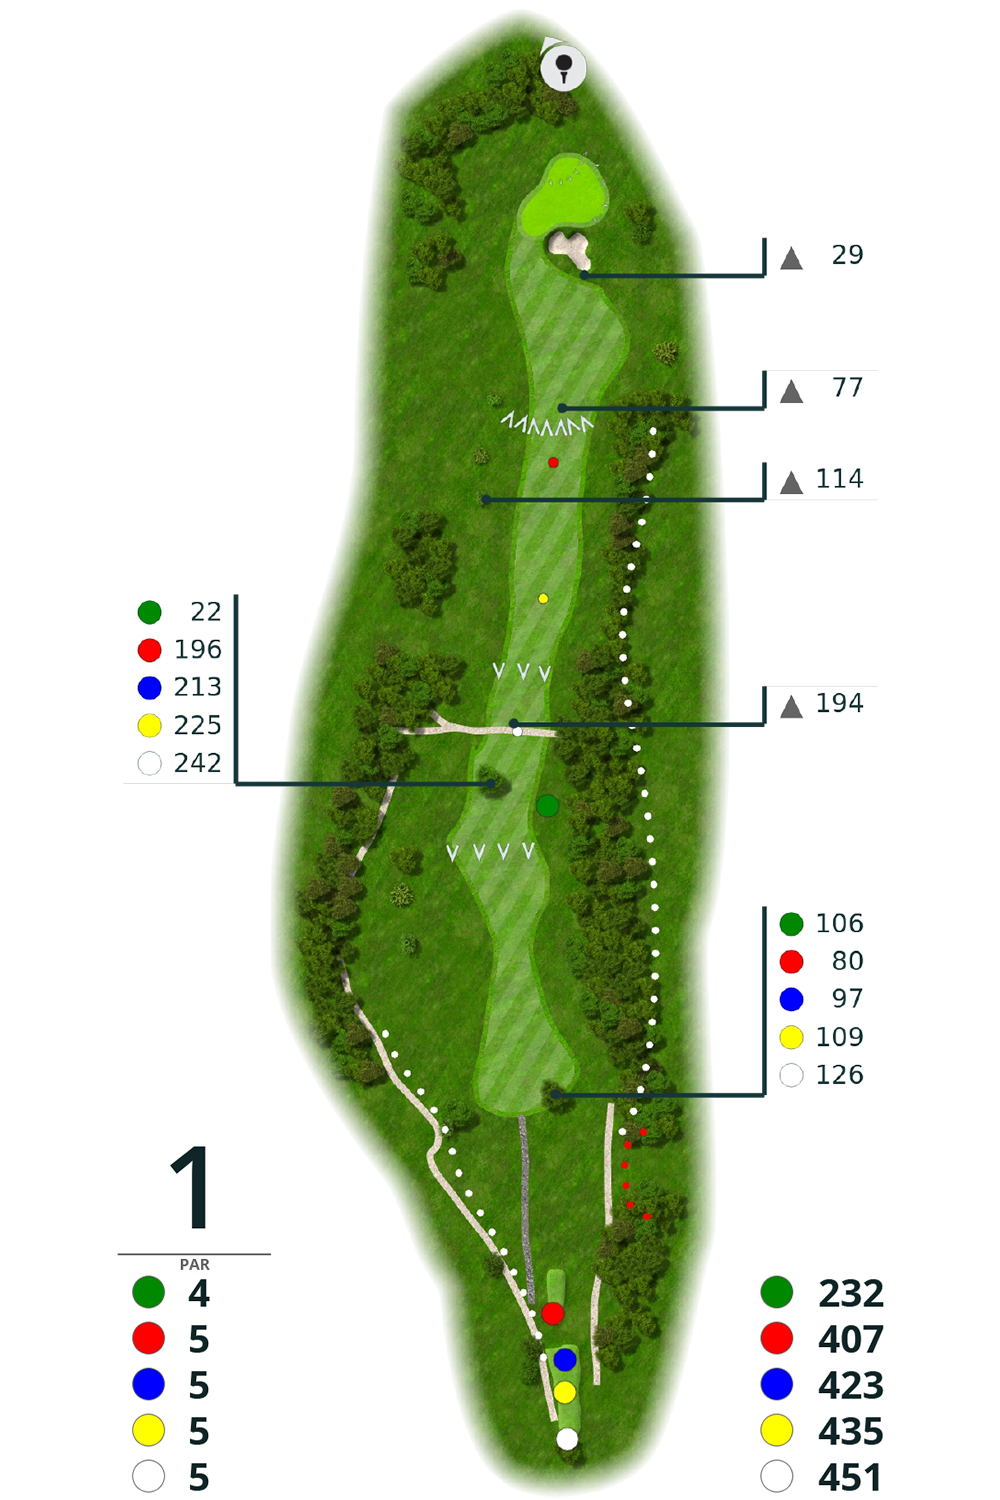
Hole 1
| Hole 1 | men | ladies | |
| white 451 m | PAR 5 | HCP 9 | |
| yellow 435 m | PAR 5 | HCP 9 | HCP 9 |
| blue 423 m | PAR 5 | HCP 9 | HCP 9 |
| red 407 m | PAR 5 | HCP 7 | HCP 9 |
| green/orange 232 m | PAR 4 |
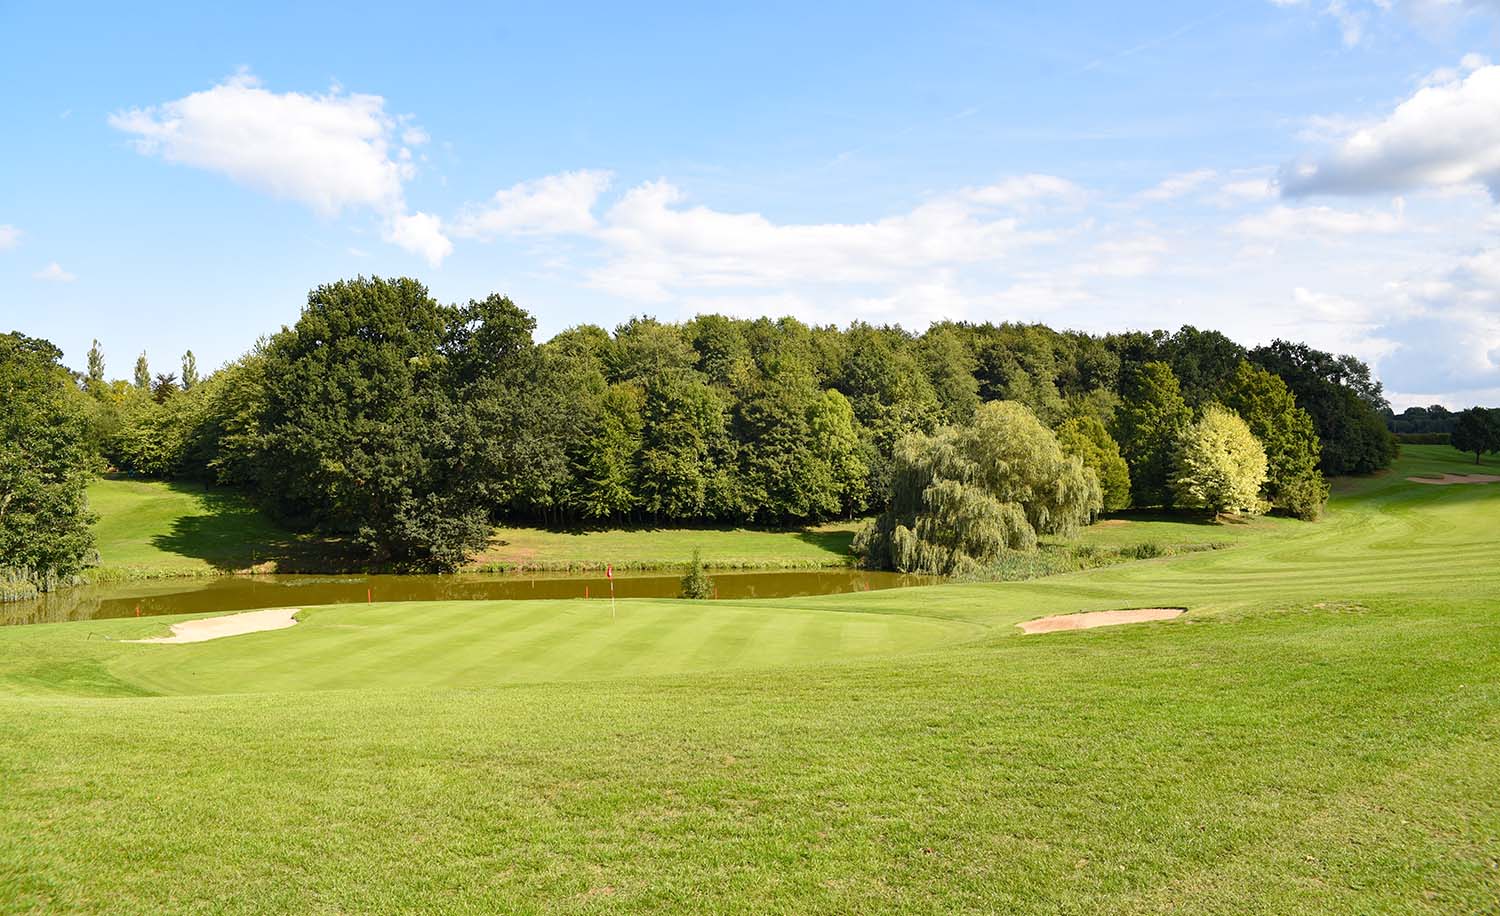
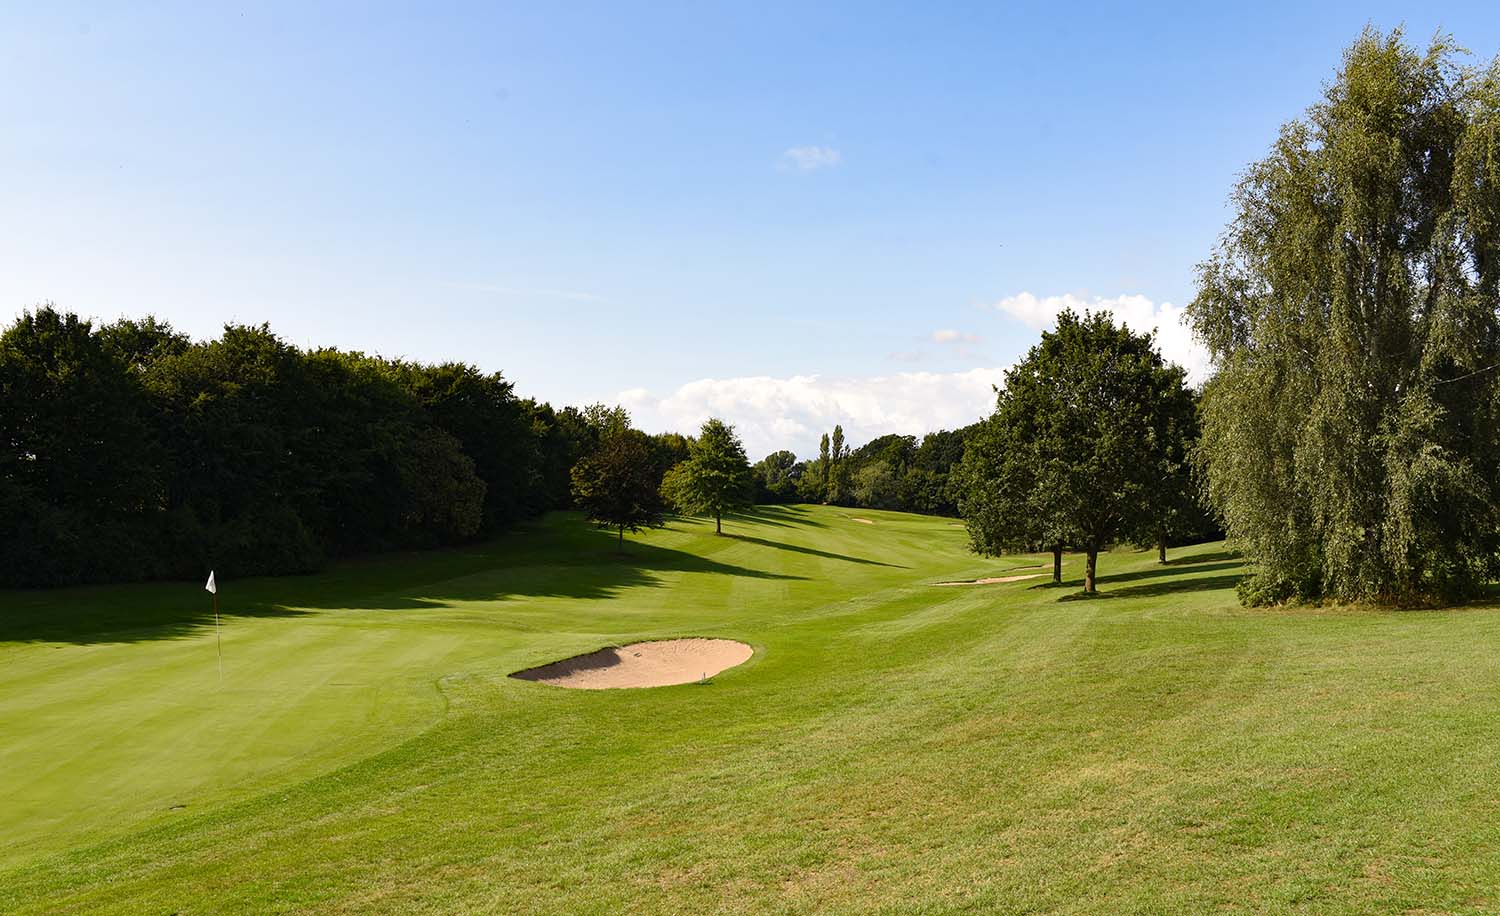
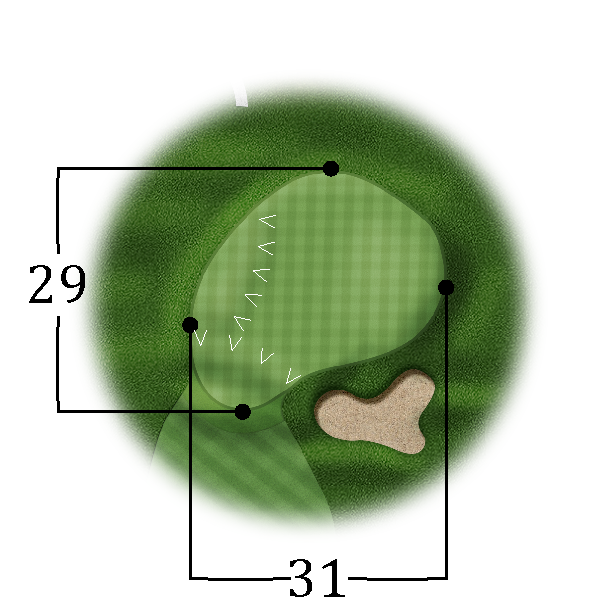
The round of golf begins with a short, but tactical PAR 5. Since there is a large old chestnut tree in the middle of the fairway, a good starting position for the second shot is a slight fade around the oak tree on the right side or a tee shot to the left side of the fairway. With the second shot you have to overcome a small hilltop, from which the green first comes into view. The frontal greenside bunker can be bypassed by approaching from the left side, and after two solid putts, the first par can then be noted on the scorecard.

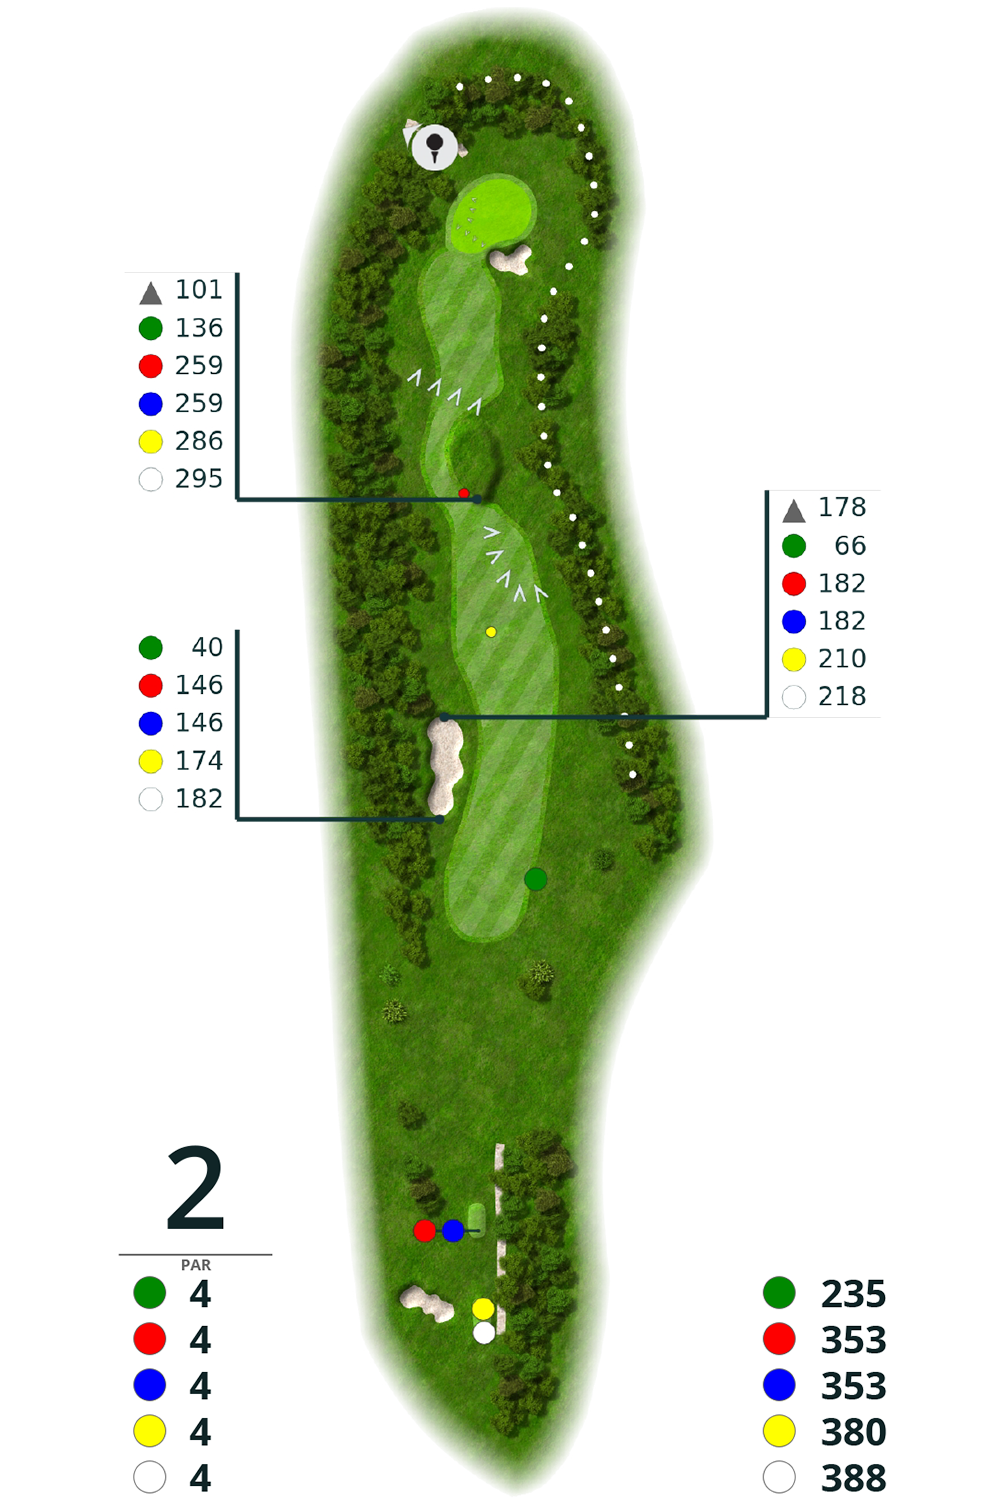
Hole 2
| Hole 2 | men | ladies | |
| white 388 m | PAR 4 | HCP 3 | |
| yellow 380 m | PAR 4 | HCP 3 | HCP3 |
| blue 353 m | PAR 4 | HCP 3 | HCP 3 |
| red/orange 353 m | PAR 4 | HCP 3 | HCP 3 |
| green 235 m | PAR 4 |
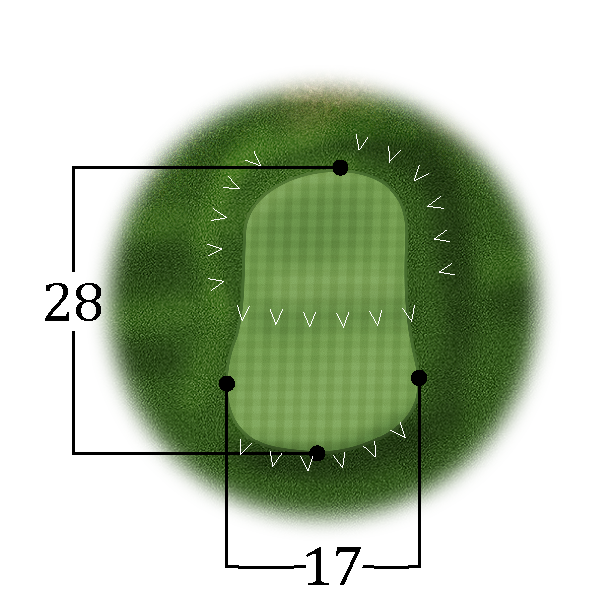
Although it's a bit downhill again right away, this hole is one of the very challenging PAR 4s in Altenhof. A well-placed fairway bunker obstructs the position for the optimal second shot on the left side. If you swerve too far to the right, trees block the clear view of the green. A tee shot to the center is rewarded, although the overall length of the course and a bunker on the right in front of the very firm green sloping to the left present further challenges.
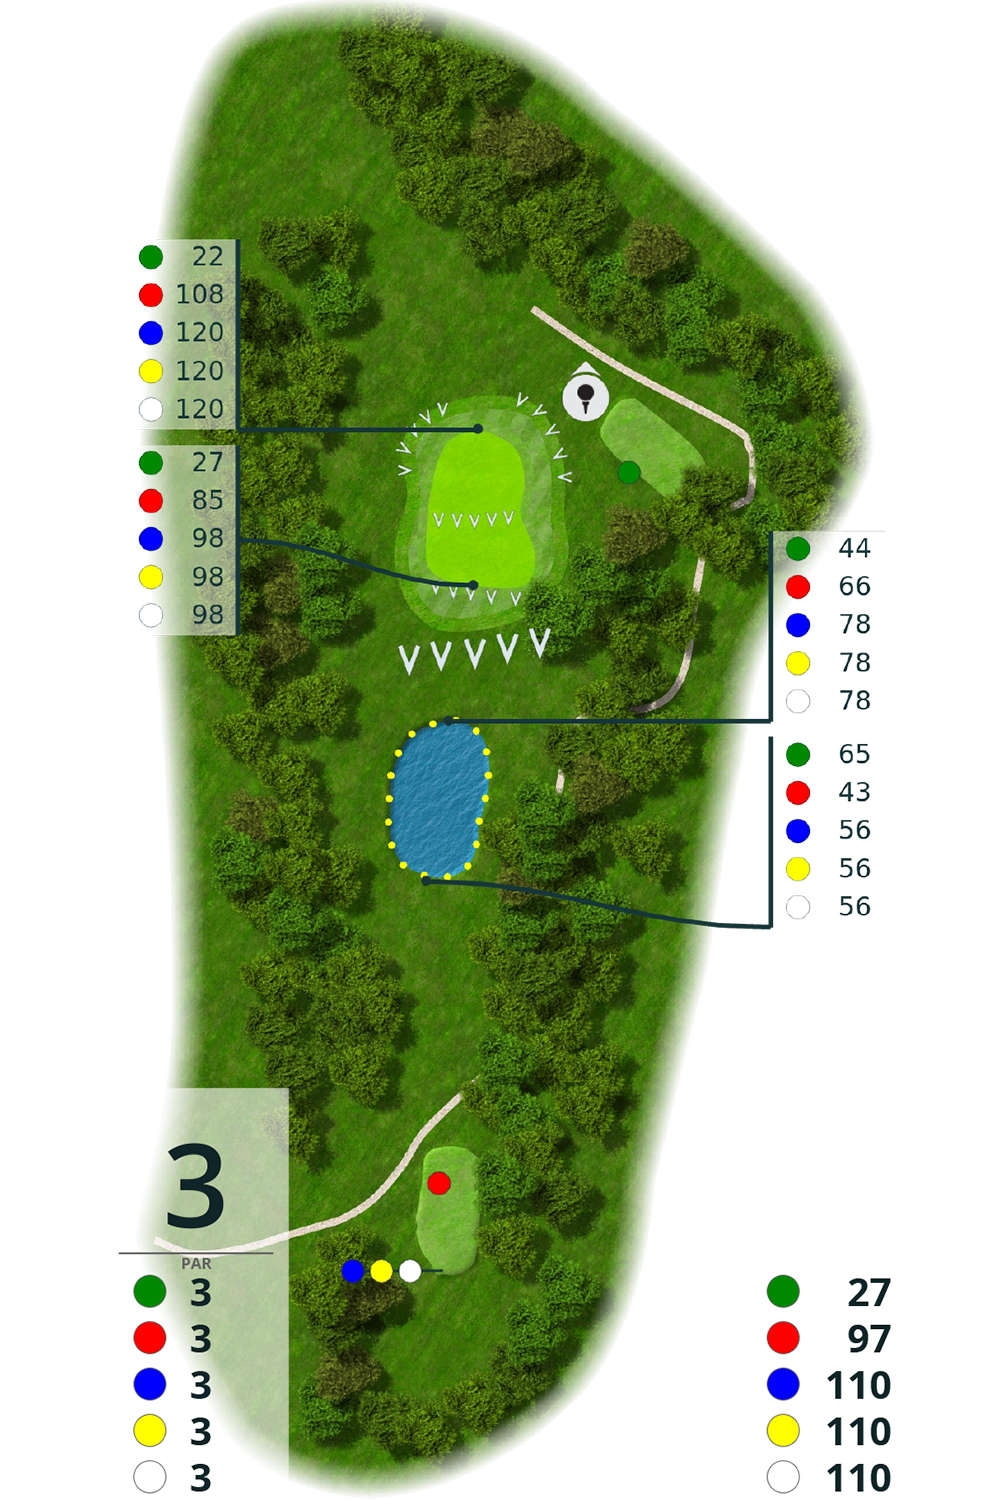
Hole 3
| Hole 3 | men | ladies | |
| white 110 m | PAR 3 | HCP 17 | |
| yellow 110 m | PAR 3 | HCP 17 | HCP 17 |
| blue 110 m | PAR 3 | HCP 17 | HCP 17 |
| red 97 m | PAR 3 | HCP 17 | HCP 17 |
| green/orange 27 m | PAR 3 |
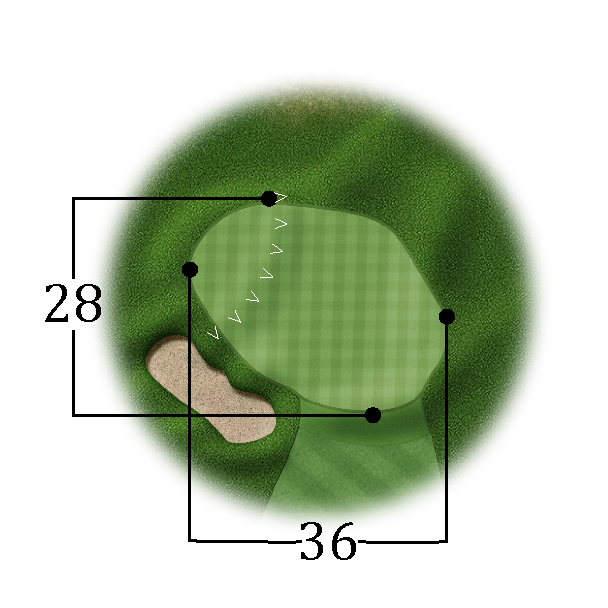
A great PAR 3, whose elevated green can be reached via a small pond and an embankment. A two-putt on the very large, undulating green is not a matter of course, even for good golfers.
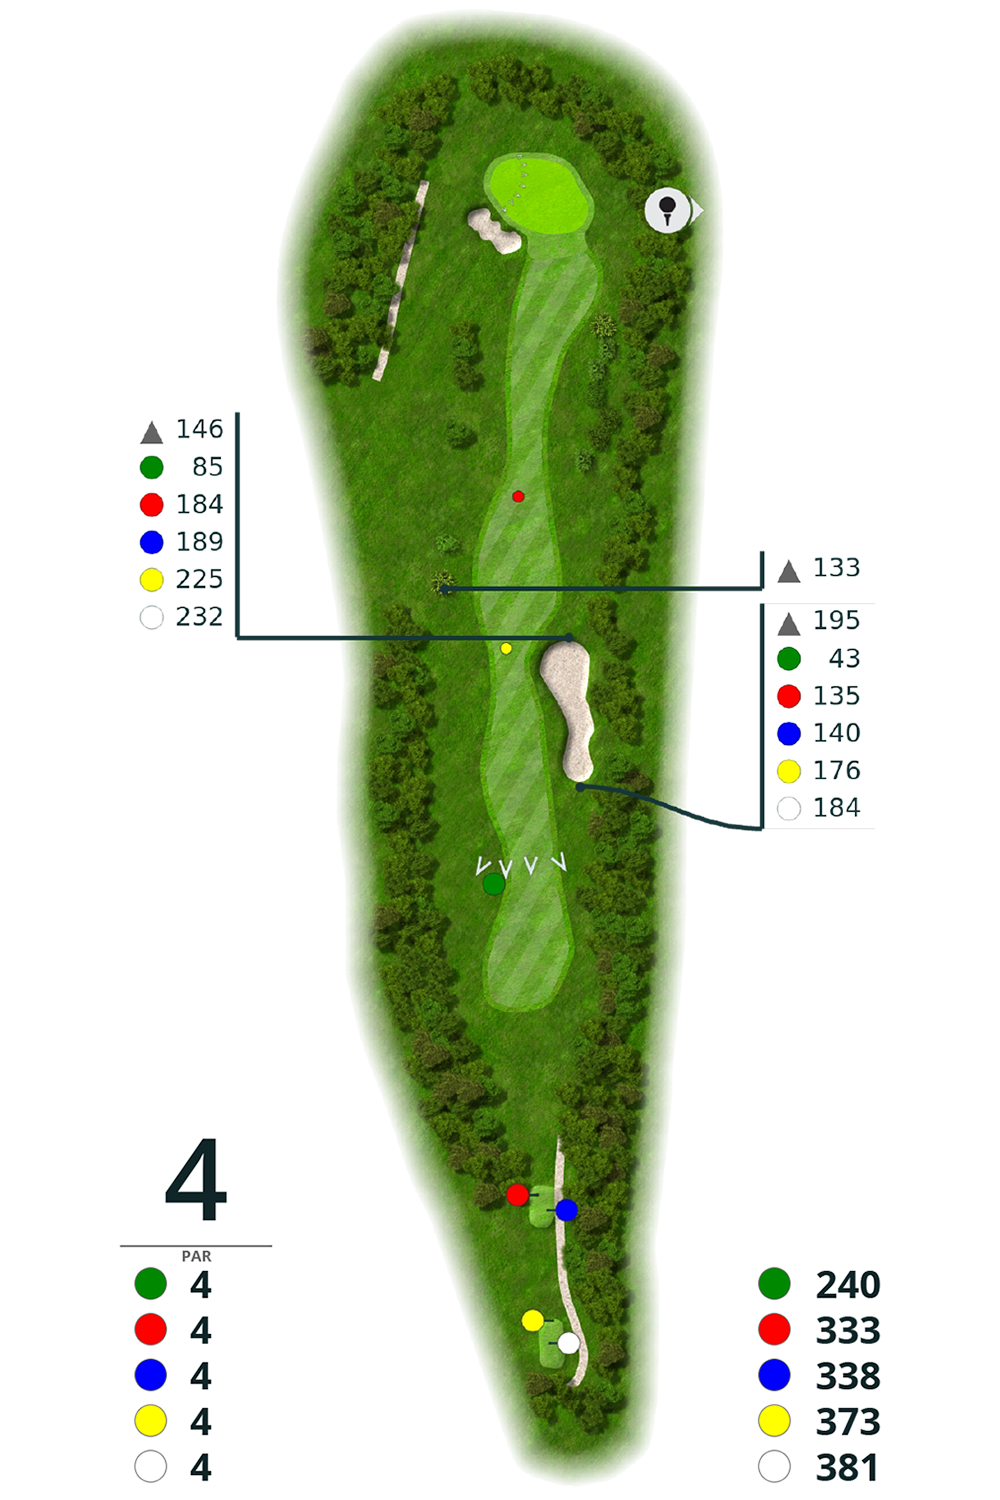
Hole 4
| Hole 4 | men | ladies | |
| white 381 m | PAR 4 | HCP 7 | |
| yellow 373 m | PAR 4 | HCP 7 | HCP 7 |
| blue 338 m | PAR 4 | HCP 7 | HCP 7 |
| red/orange 333 m | PAR 4 | HCP 5 | HCP 7 |
| green 240 m | PAR 4 |
The tee shot at the subsequent long PAR 4 is located in a small forest aisle. A fairway bunker on the right side tempts the player to the left. However, the optimal position for the tee shot is "close to the bunker". With the second shot it means to stay in the short mown in any case, because deep Festucagrass waits both on the right and on the left of the fairway. In addition, the very large green on the left is guarded by a bunker.
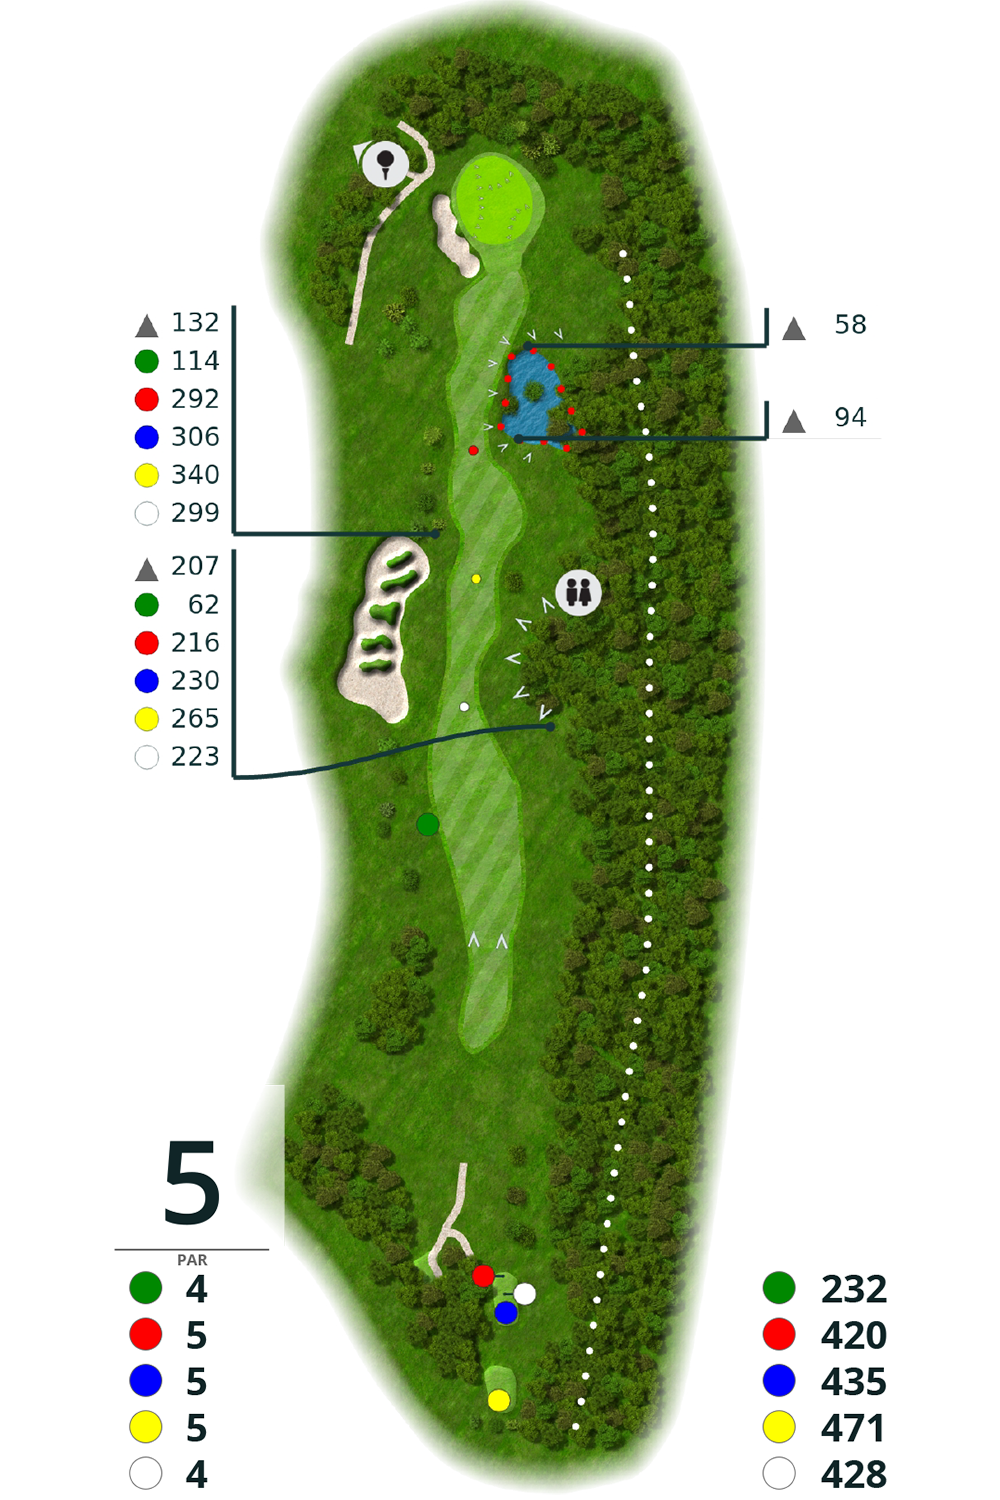
Hole 5
| Hole 5 | men | ladies | |
| white 428 m | PAR 4 | HCP 1 | |
| yellow 471 m | PAR 5 | HCP 11 | HCP 11 |
| blue 435 m | PAR 5 | HCP 11 | HCP 11 |
| red/orange 420 m | PAR 5 | HCP 1 | HCP 11 |
| green 232 m | PAR 4 |
Here you have a beautiful view from the tee into the "old gravel pit" and to the green of the tricky PAR 5. Several groups of trees on the left and right of the fairway, as well as a water hazard on the right side about 80 m before the green require precise shots from the beginning. A bunker on the left directly in front of the strongly ondulated green requires good tactics to secure the par.

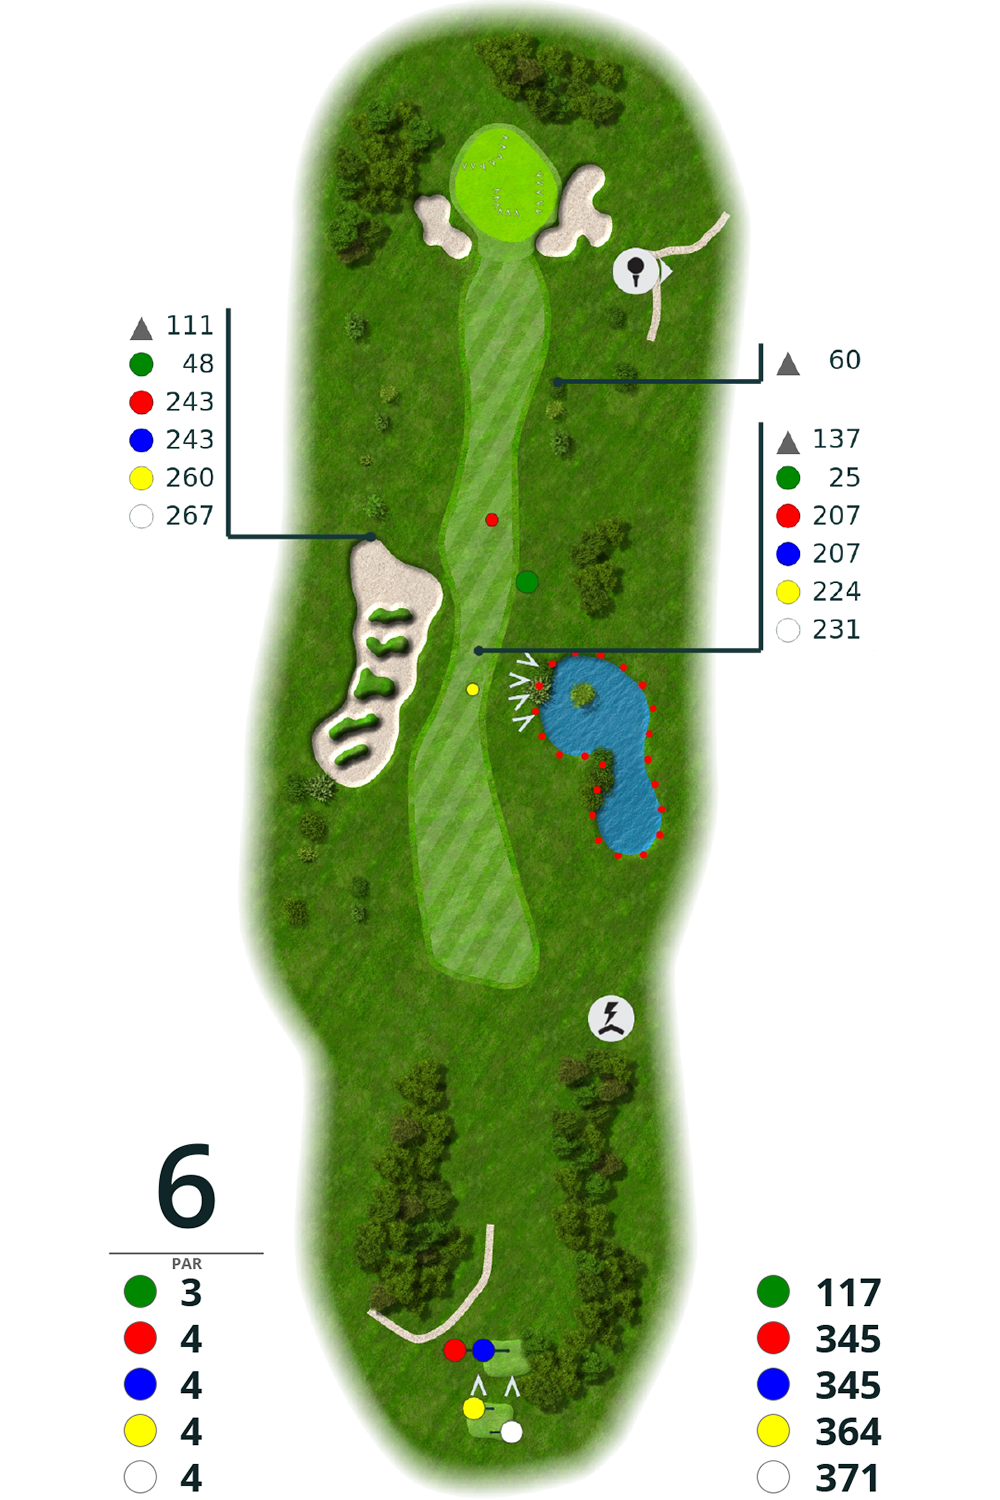
Hole 6
| Hole 6 | men | ladies | |
| white 371 m | PAR 4 | HCP 13 | |
| yellow 364 m | PAR 4 | HCP 13 | HCP 13 |
| blue 345 m | PAR 4 | HCP 13 | HCP 13 |
| red 345 m | PAR 4 | HCP 9 | HCP 13 |
| green/orange 117 m | PAR 3 |
The elevated men's tee of PAR 4 also offers a nice view into the gravel pit, especially due to the variety of colors of the different trees in autumn. At about 150 m to the green, a water hazard on the right and a generous group of bunkers on the left make the fairway a bit narrower. Long hitters can negotiate both with their first shot. The green is defended by two bunkers.
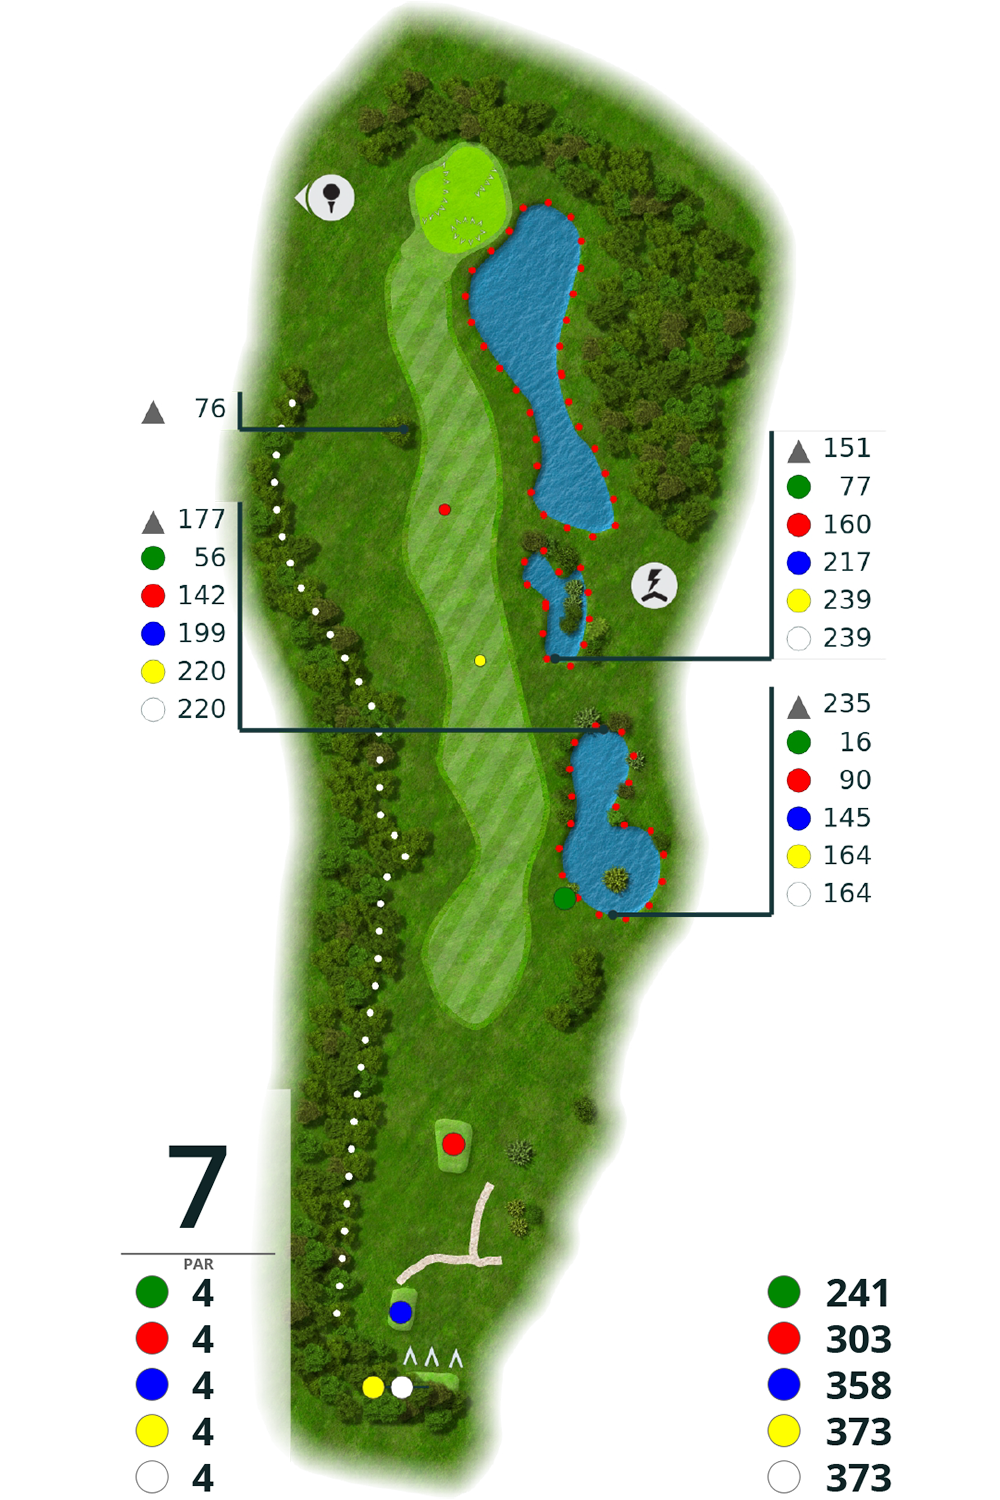
Hole 7
| hole 7 | men | ladies | |
| white 373 m | PAR 4 | HCP 5 | |
| yellow 373 m | PAR 4 | HCP 1 | HCP 1 |
| blue 358 m | PAR 4 | HCP 1 | HCP 1 |
| red/orange 303 m | PAR 4 | HCP 11 | HCP 1 |
| green 241 m | PAR 4 |
A narrow PAR 4 with water hazards guarding the entire hole on the right side. An out boundary on the left side gives the player hope for a good shot already at the tee. The green should be approached from the left side. When putting, different waves in the green require all the attention.
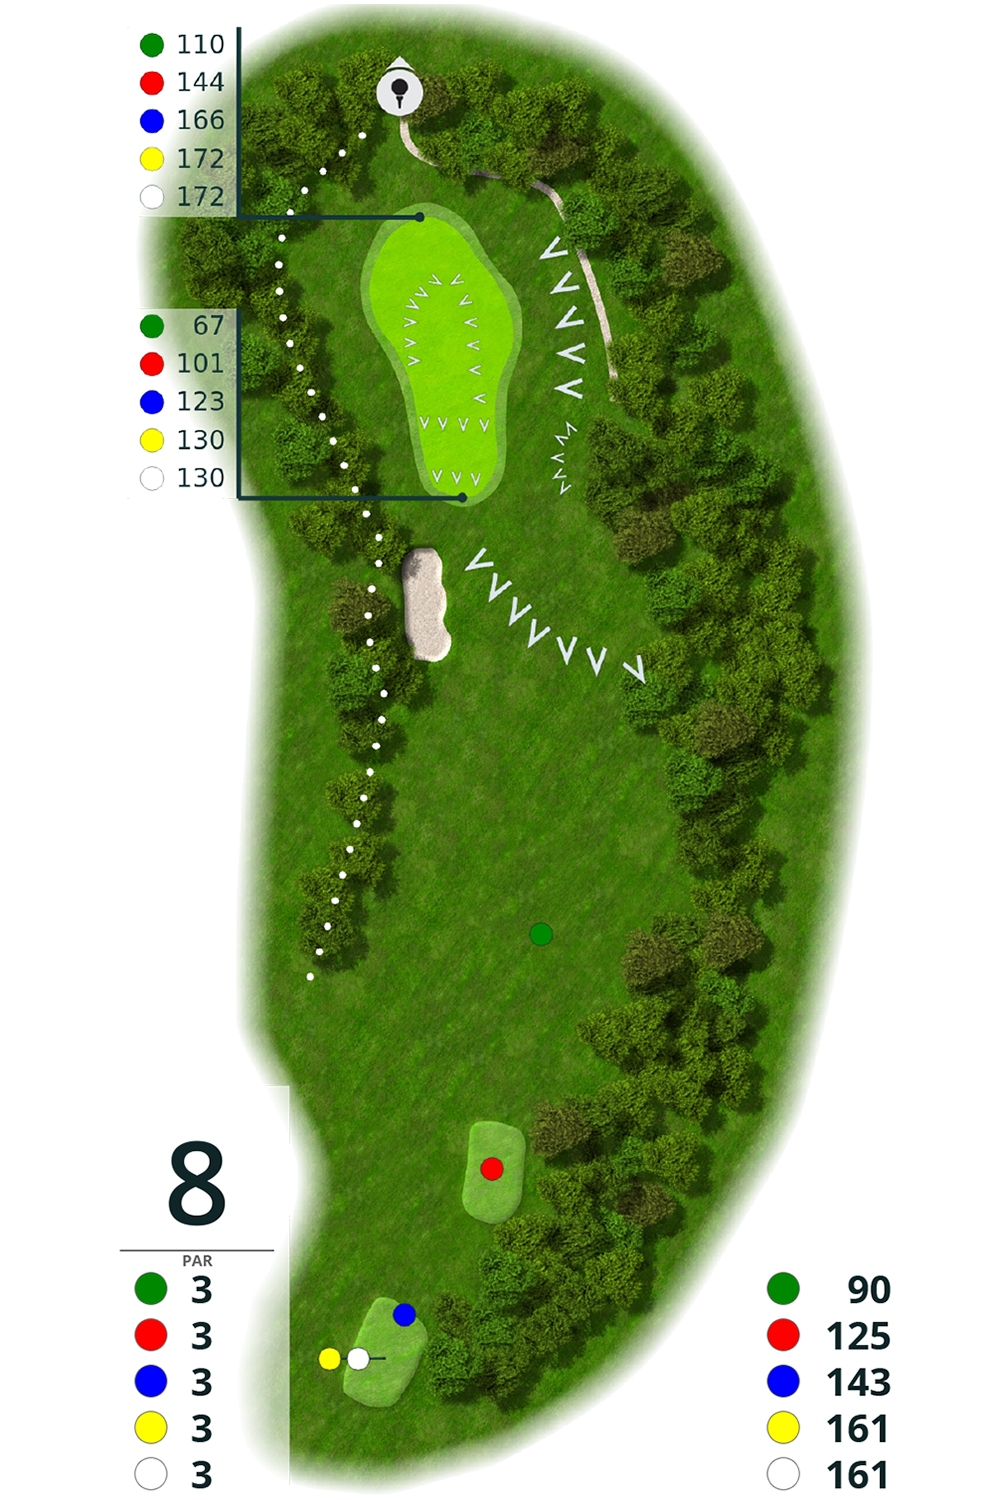
Hole 8
| Hole 8 | men | ladies | |
| white 161 m | PAR 3 | HCP 15 | |
| yellow 161 m | PAR 3 | HCP 15 | HCP 15 |
| blue 143 m | PAR 3 | HCP 15 | HCP 15 |
| red 125 m | PAR 3 | HCP 15 | HCP 15 |
| green/orange 90 m | PAR 3 |
Now follows a challenging PAR 3. On the left side throughout a fringe and right before the green on a small slope a large tree demand a precise shot on the high green. Also, the funnel shape of the green should not be underestimated when putting.

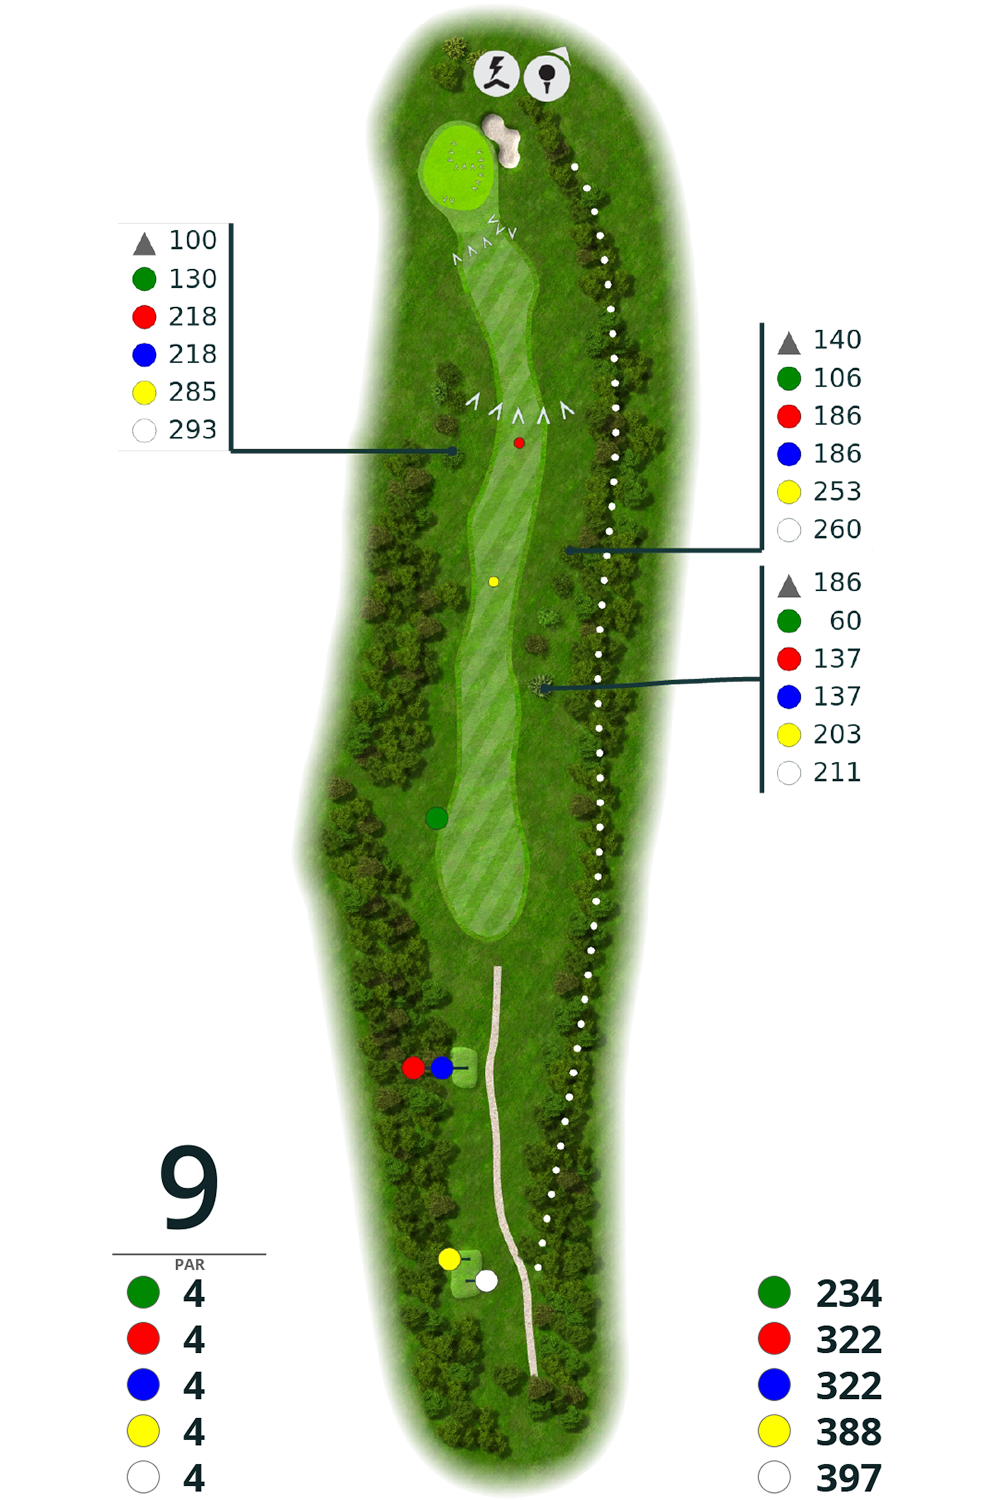
Hole 9
| Hole 9 | men | ladies | |
| white 379 m | PAR 4 | HCP 11 | |
| yellow 388 m | PAR 4 | HCP 5 | HCP 5 |
| blue 322 m | PAR 4 | HCP 5 | HCP 5 |
| red/orange 322 m | PAR 4 | HCP 13 | HCP 5 |
| green 234 m | PAR 4 |
For a good result on this PAR 4, the tee shot should be played to the right side of the fairway, but not too close to the five cedars. The green is also generally not visible on the second shot, but this is not problematic, as only a bunker at the back right stops balls played too long. The generous green requires a solid two-putt.

powered by:

Hole 10
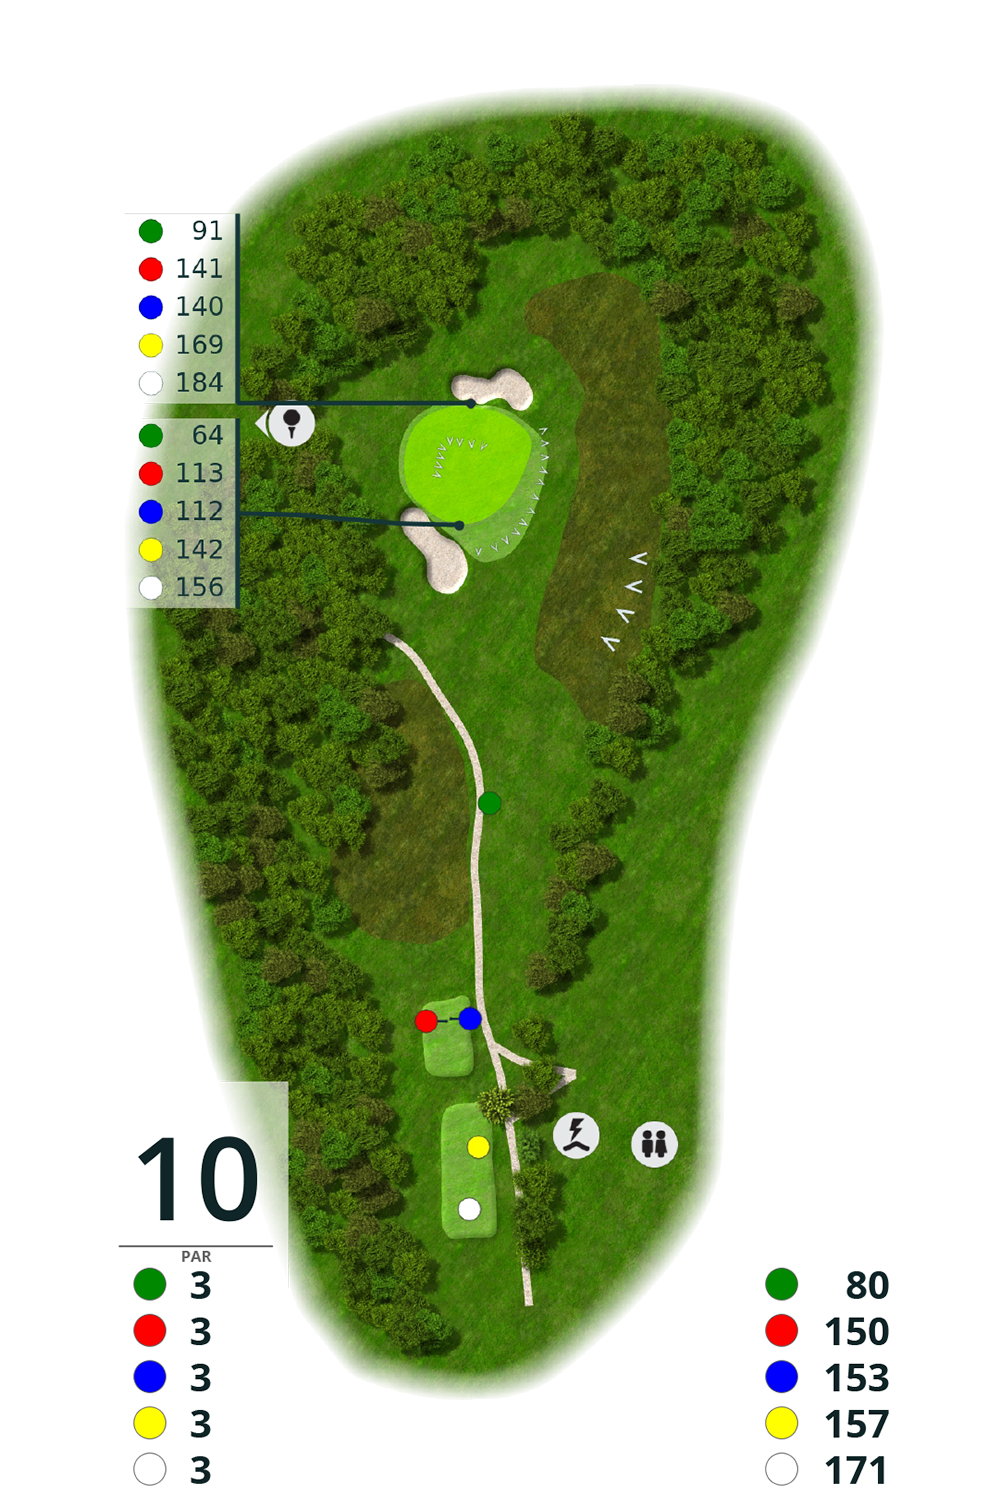
| Hole 10 | men | ladies | |
| white 171 m | PAR 3 | HCP 18 | |
| yellow 157 m | PAR 3 | HCP 18 | HCP 18 |
| blue 153 m | PAR 3 | HCP 18 | HCP 18 |
| red/orange 150 m | PAR 3 | HCP 16 | HCP 18 |
| green 80 m | PAR 3 |
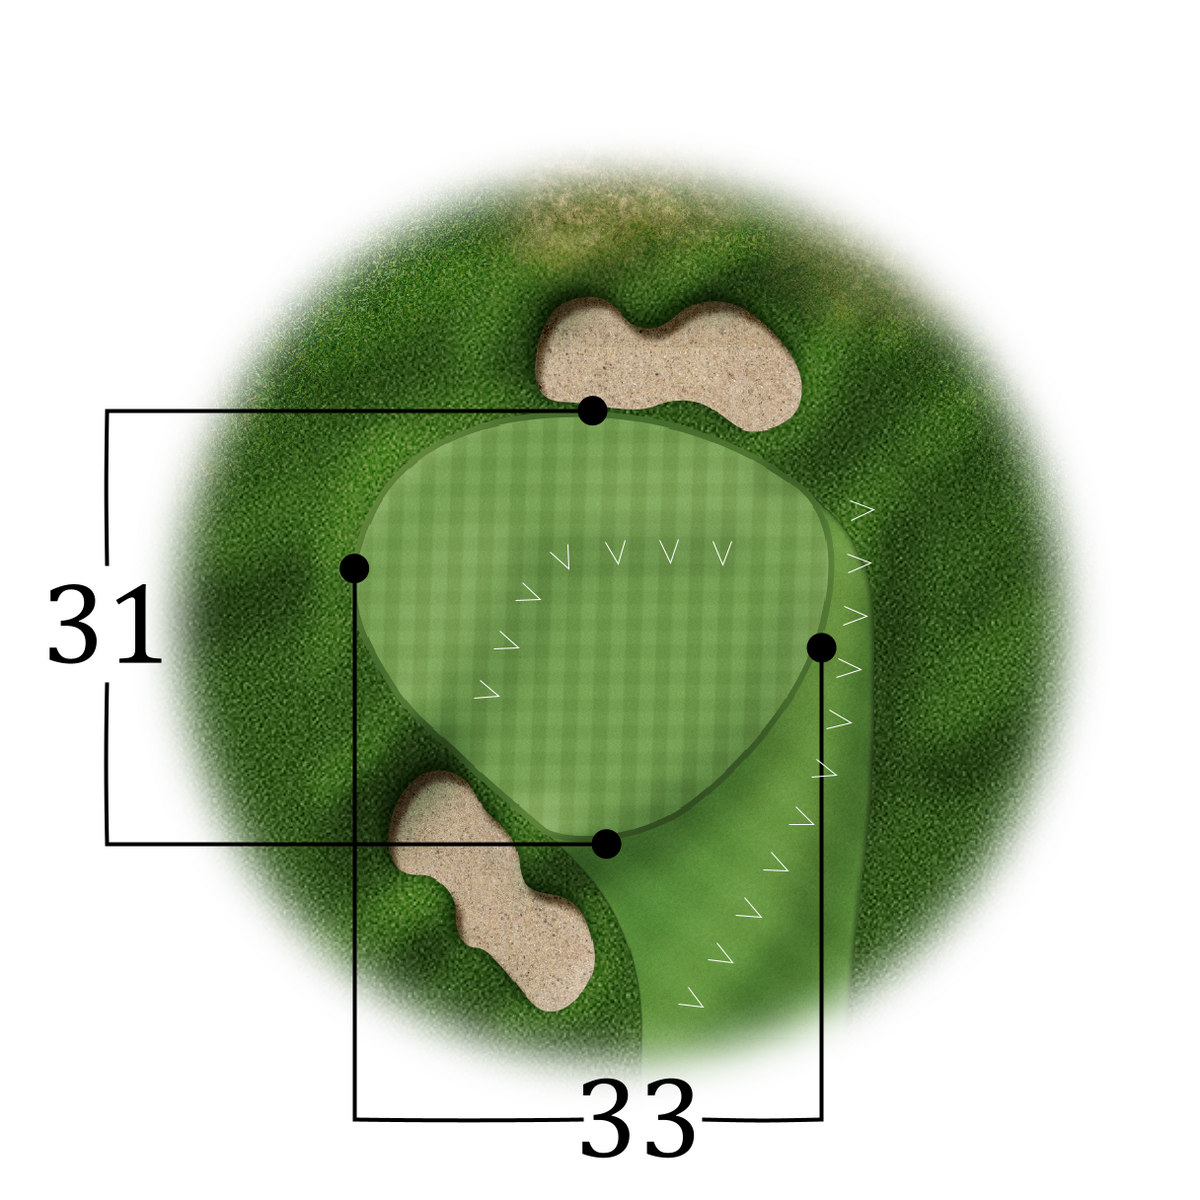
After a short break in our cozy halfway house, the second half round begins with a PAR 3. If you don't want to play directly to the green, which is defended by a bunker, there is plenty of room to put the ball down on the right. With a chip, any flag position can be played from there and after the putt, the par can be noted on the scorecard.
powered by:
Hole 11
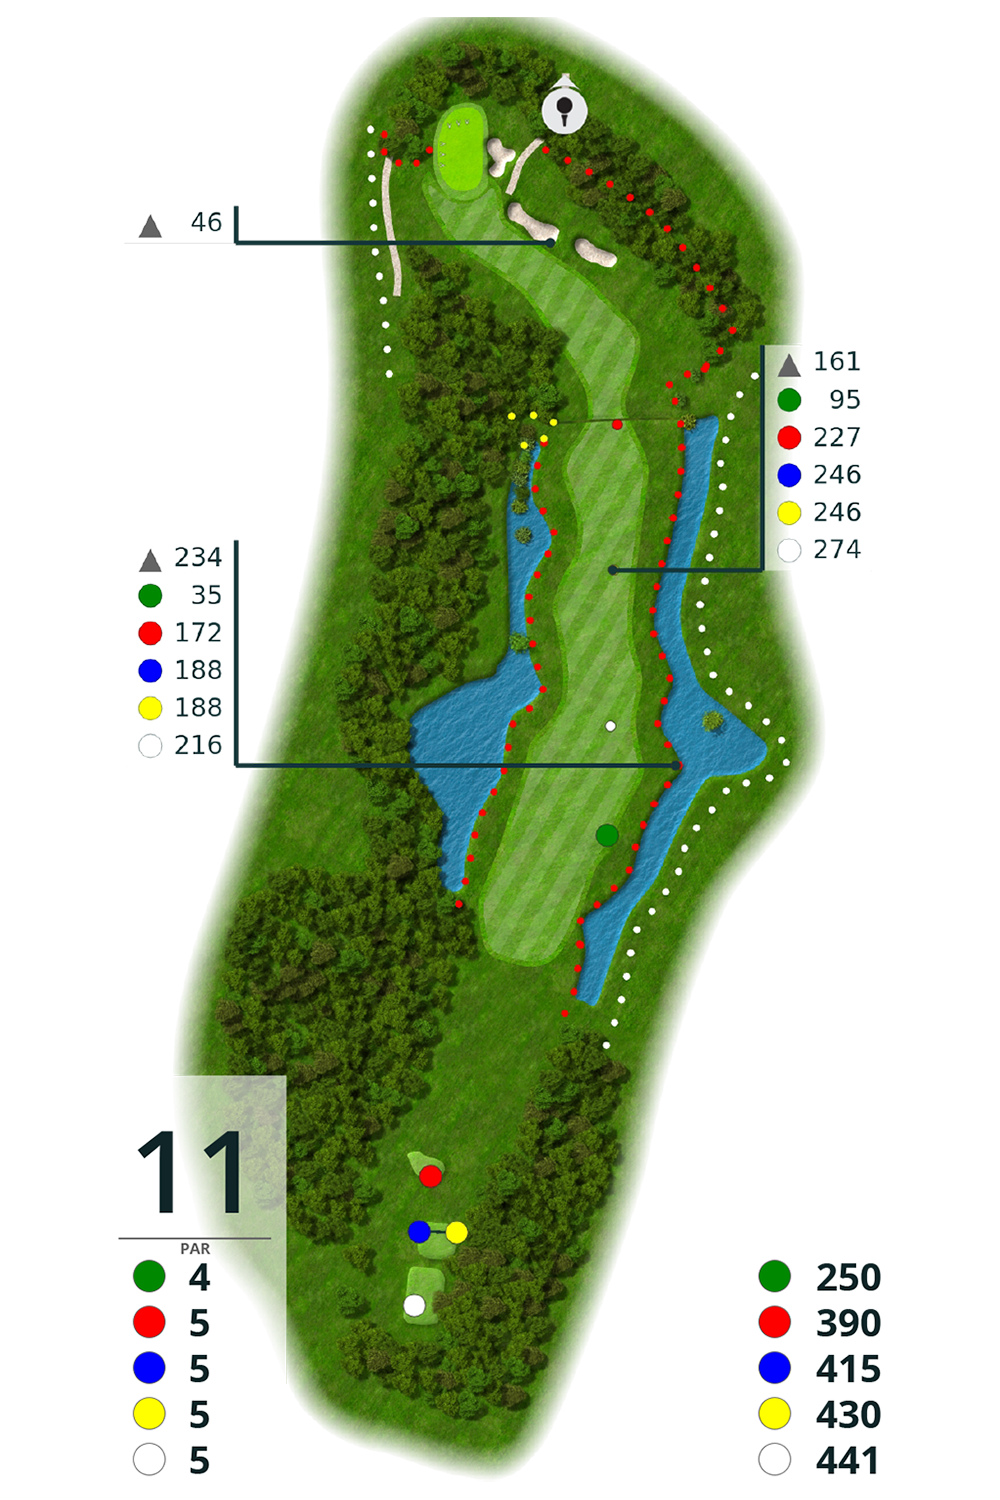
| Hole 11 | men | ladies | |
| white 441 m | PAR 5 | HCP 12 | |
| yellow 430 m | PAR 5 | HCP 6 | HCP 6 |
| blue 415 m | PAR 5 | HCP 6 | HCP 6 |
| red 390 m | PAR 5 | HCP 2 | HCP 6 |
| green/orange 250 m | PAR 4 |
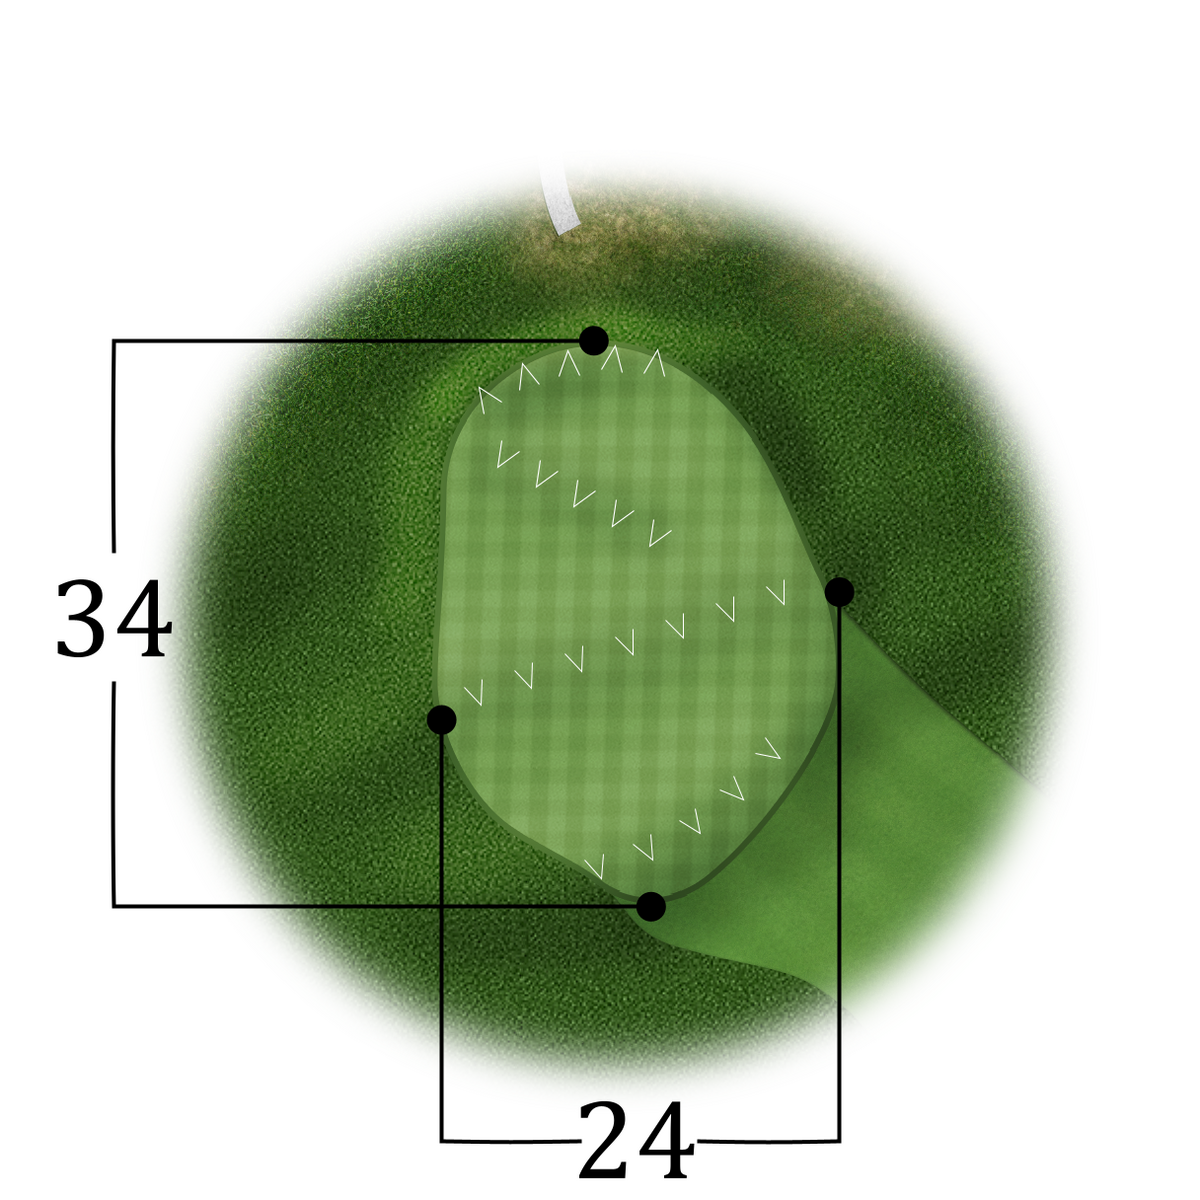
From the tee to the dogleg, this PAR 5 is accompanied by water on the left and right. If you place your second shot safely in the dogleg, you can play the green, which is carefully built into the forest, well. Two bunkers on the right side of the green require the right club selection.

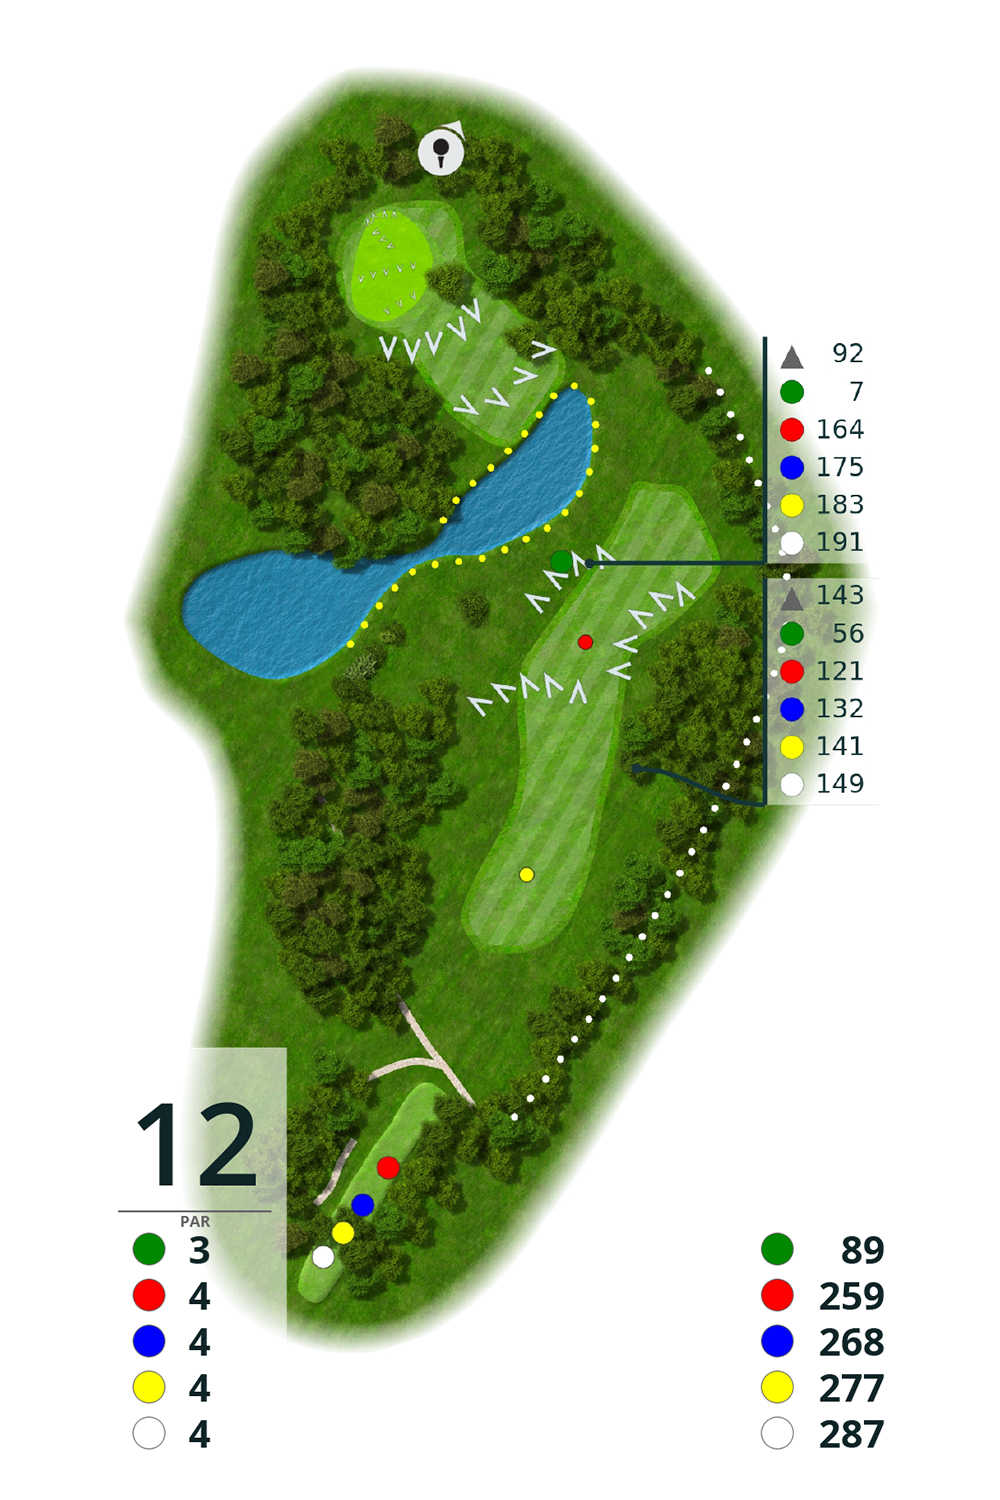
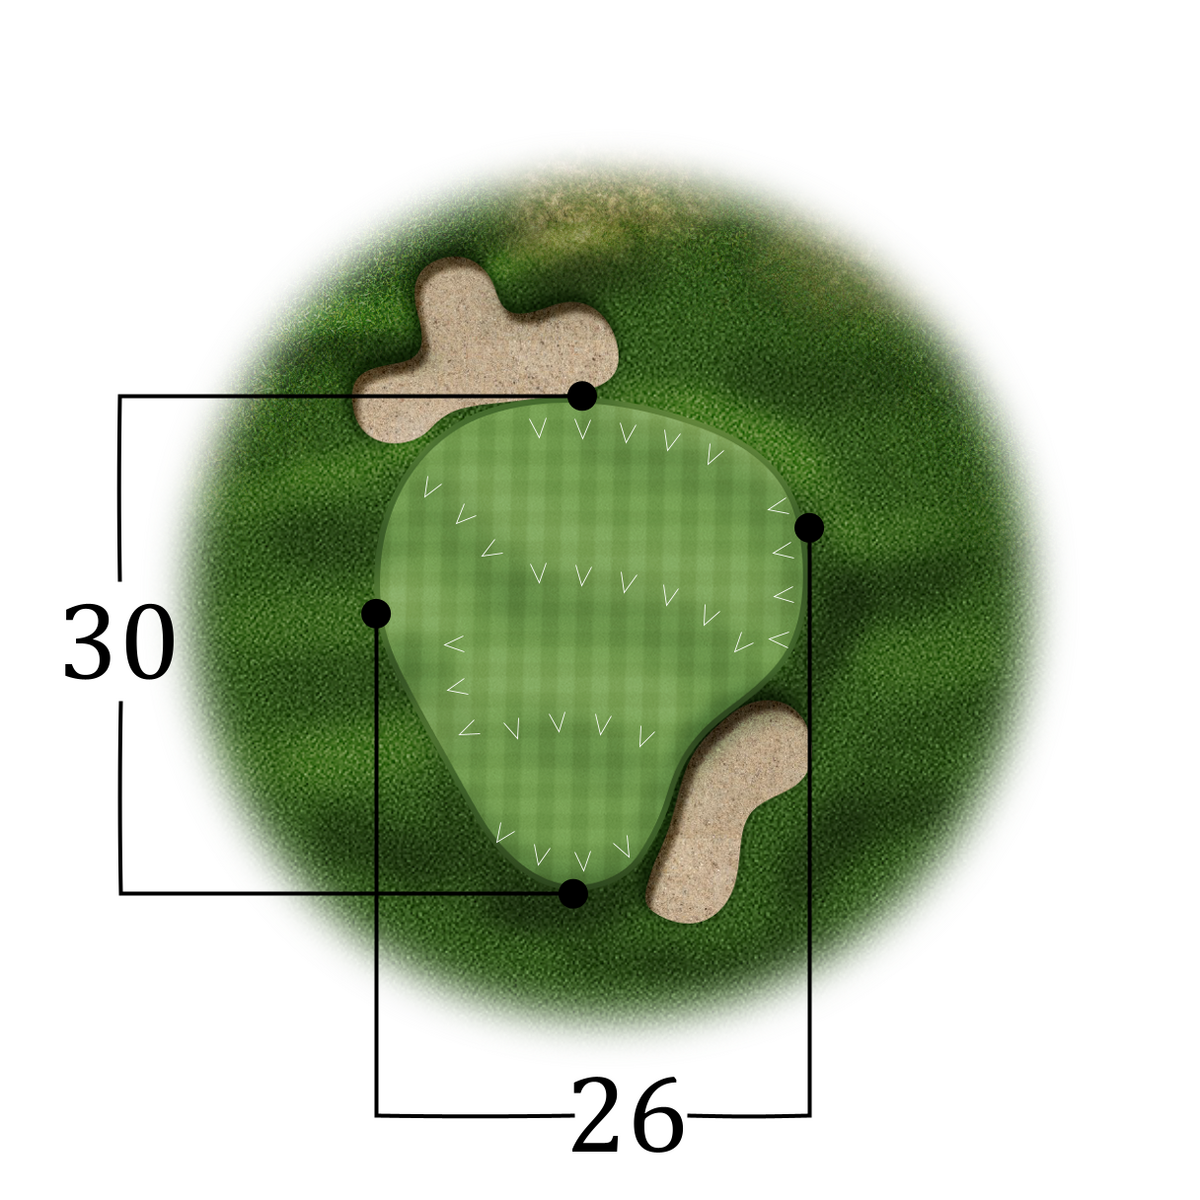
Hole 12
| Hole 12 | men | ladies | |
| white 287 m | PAR 4 | HCP 4 | |
| yellow 277 m | PAR 4 | HCP 4 | HCP 4 |
| blue 268 m | PAR 4 | HCP 4 | HCP 4 |
| red/orange 259 m | PAR 4 | HCP 8 | HCP 4 |
| green 89 m | PAR 3 |
A blind tee shot which should be played rather defensively due to the frontal water hazard approx. 80 m before the green. From the right side of the fairway you can play well to the strongly elevated green of this PAR 4, which is enclosed by trees.
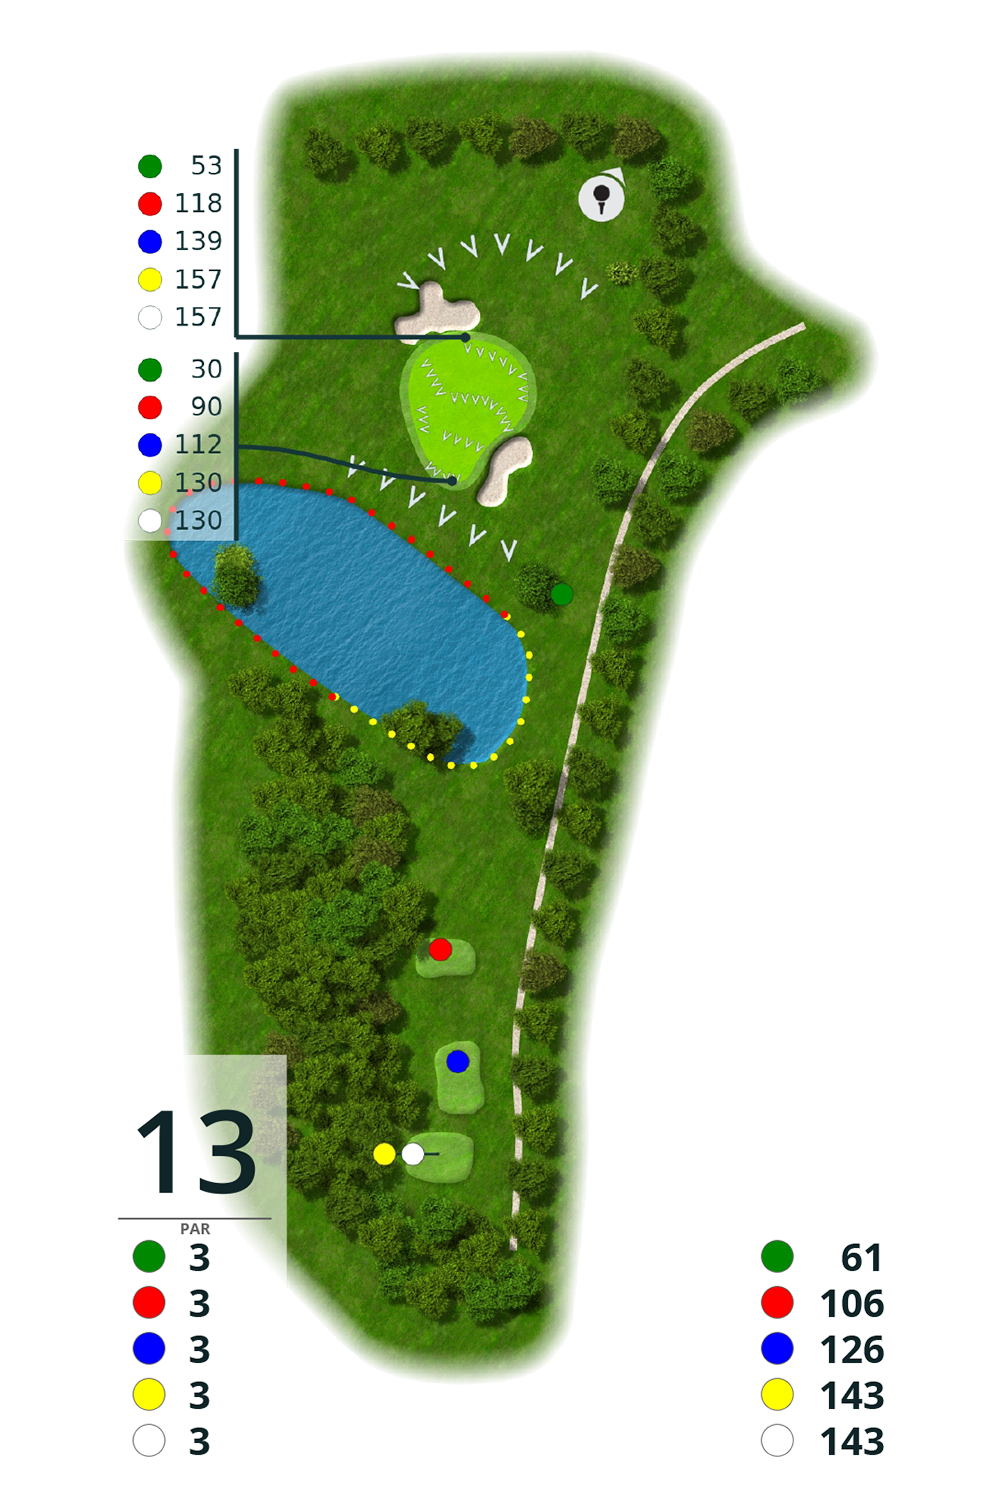
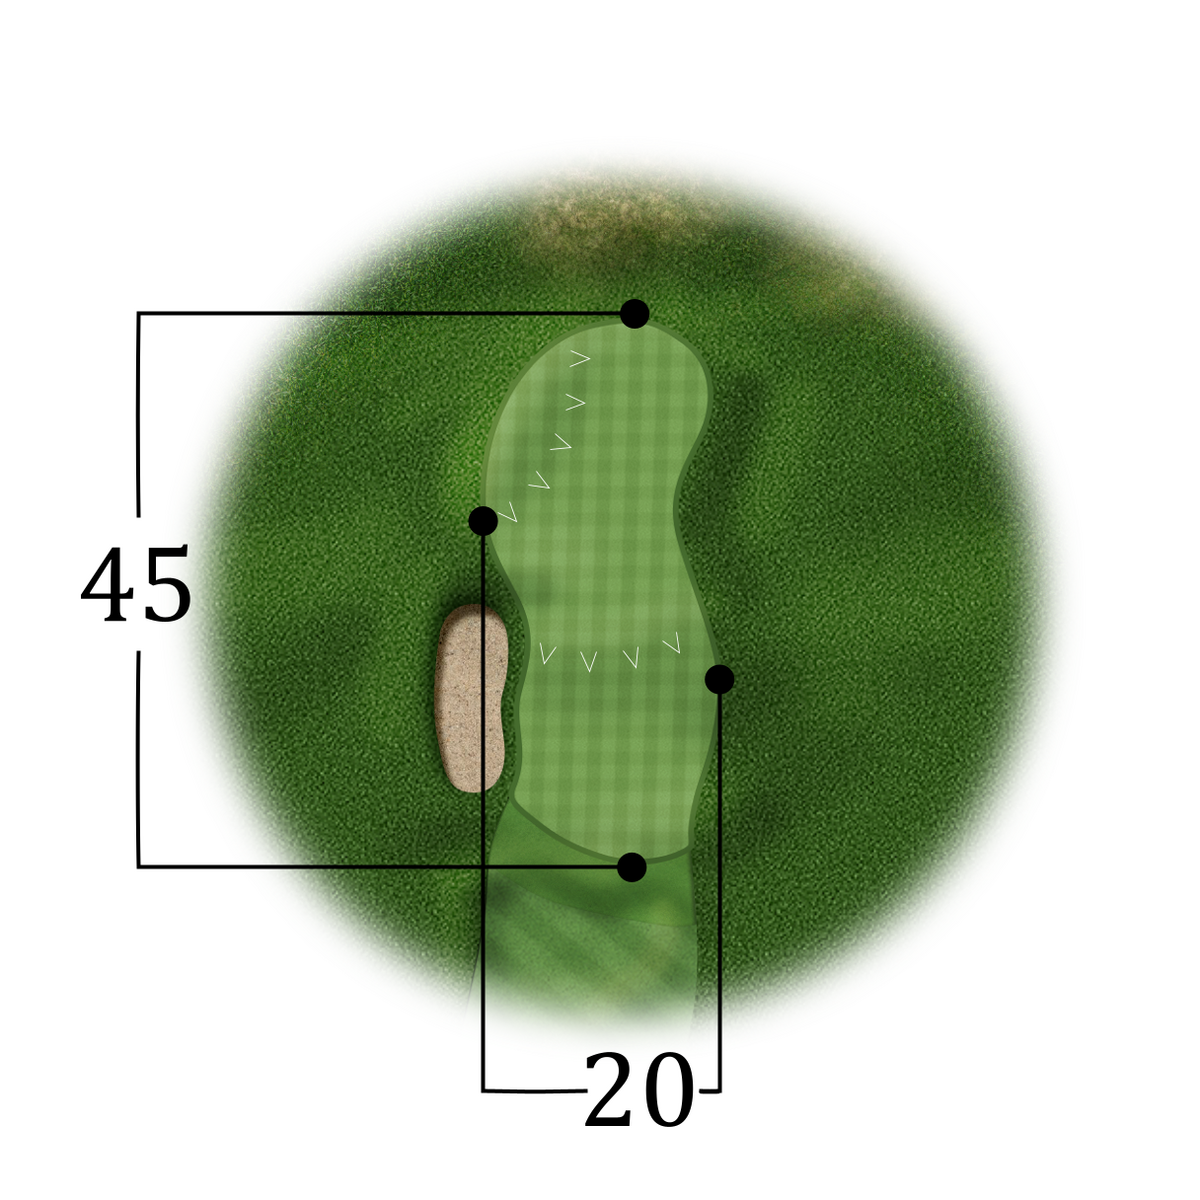
Hole 13
| Hole 13 | men | ladies | |
| white 143 m | PAR 3 | HCP 16 | |
| yellow 143 m | PAR 3 | HCP 16 | HCP 16 |
| blue 126 m | PAR 3 | HCP 16 | HCP 16 |
| red/orange 106 m | PAR 3 | HCP 18 | HCP 16 |
| green 61 m | PAR 3 |
This course is a nice PAR 3 and is defended by a wide water hazard in front of the green. Especially with headwinds, this must be overcome first. The green is strongly ondulated. A wave in the middle of the green makes uphill putts slow and downhill putts fast. A lot of feeling is required here.
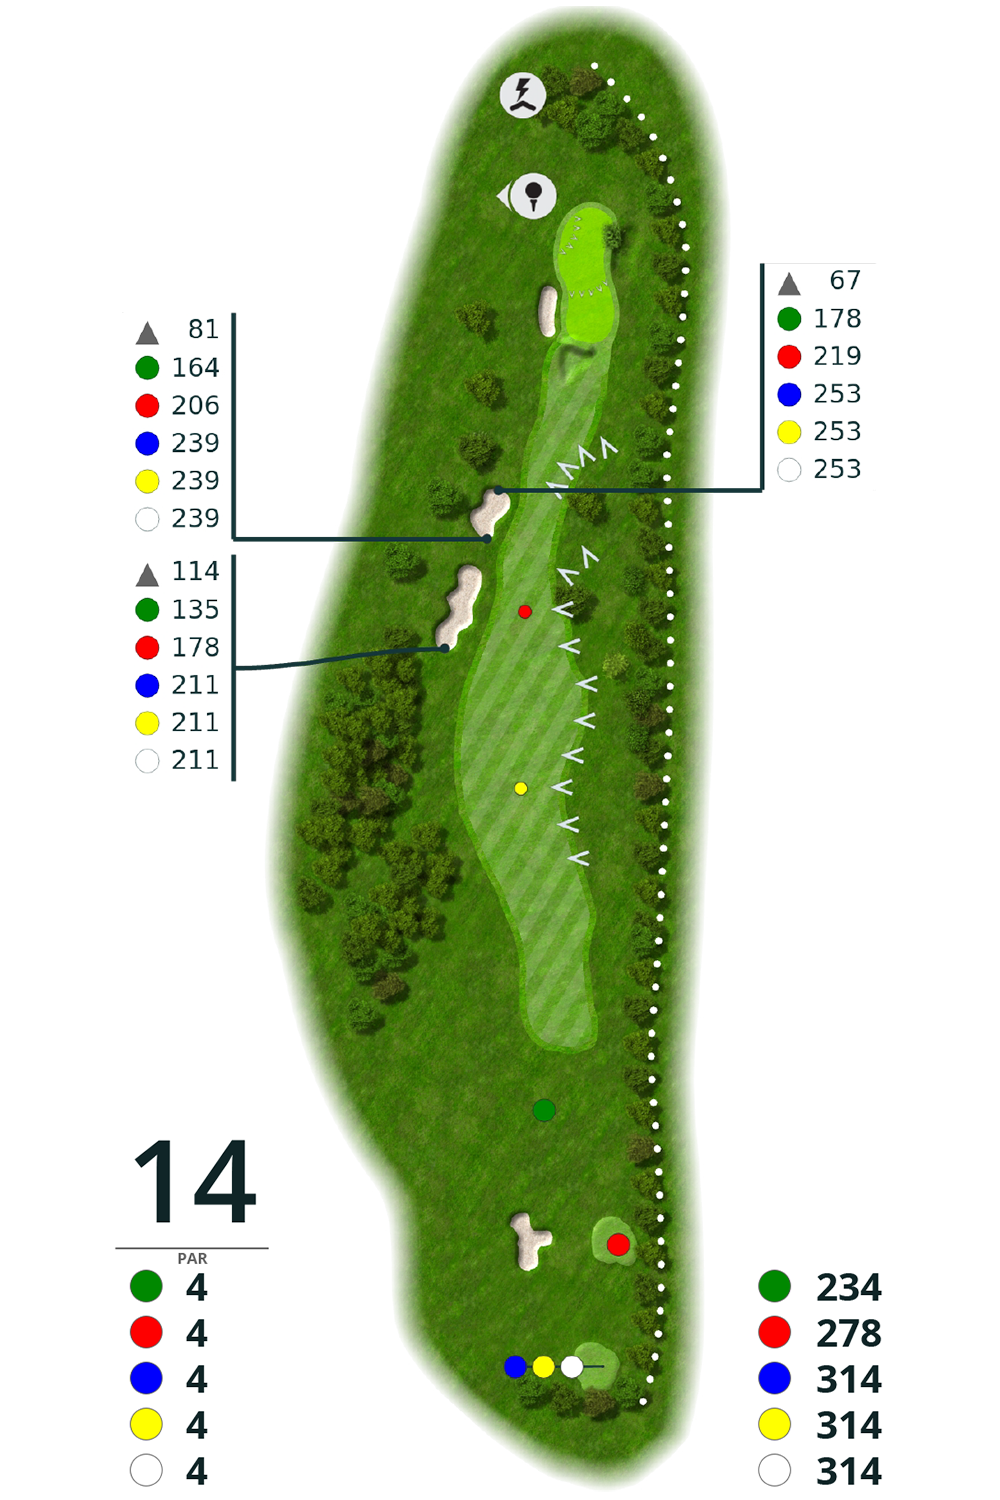
Hole 14
| Hole 14 | men | ladies | |
| white 314 m | PAR 4 | HCP 14 | |
| yellow 314 m | PAR 4 | HCP 14 | HCP 14 |
| blue 314 m | PAR 4 | HCP 14 | HCP 14 |
| red/orange 278 m | PAR 4 | HCP 14 | HCP 14 |
| green 234 m | PAR 4 |
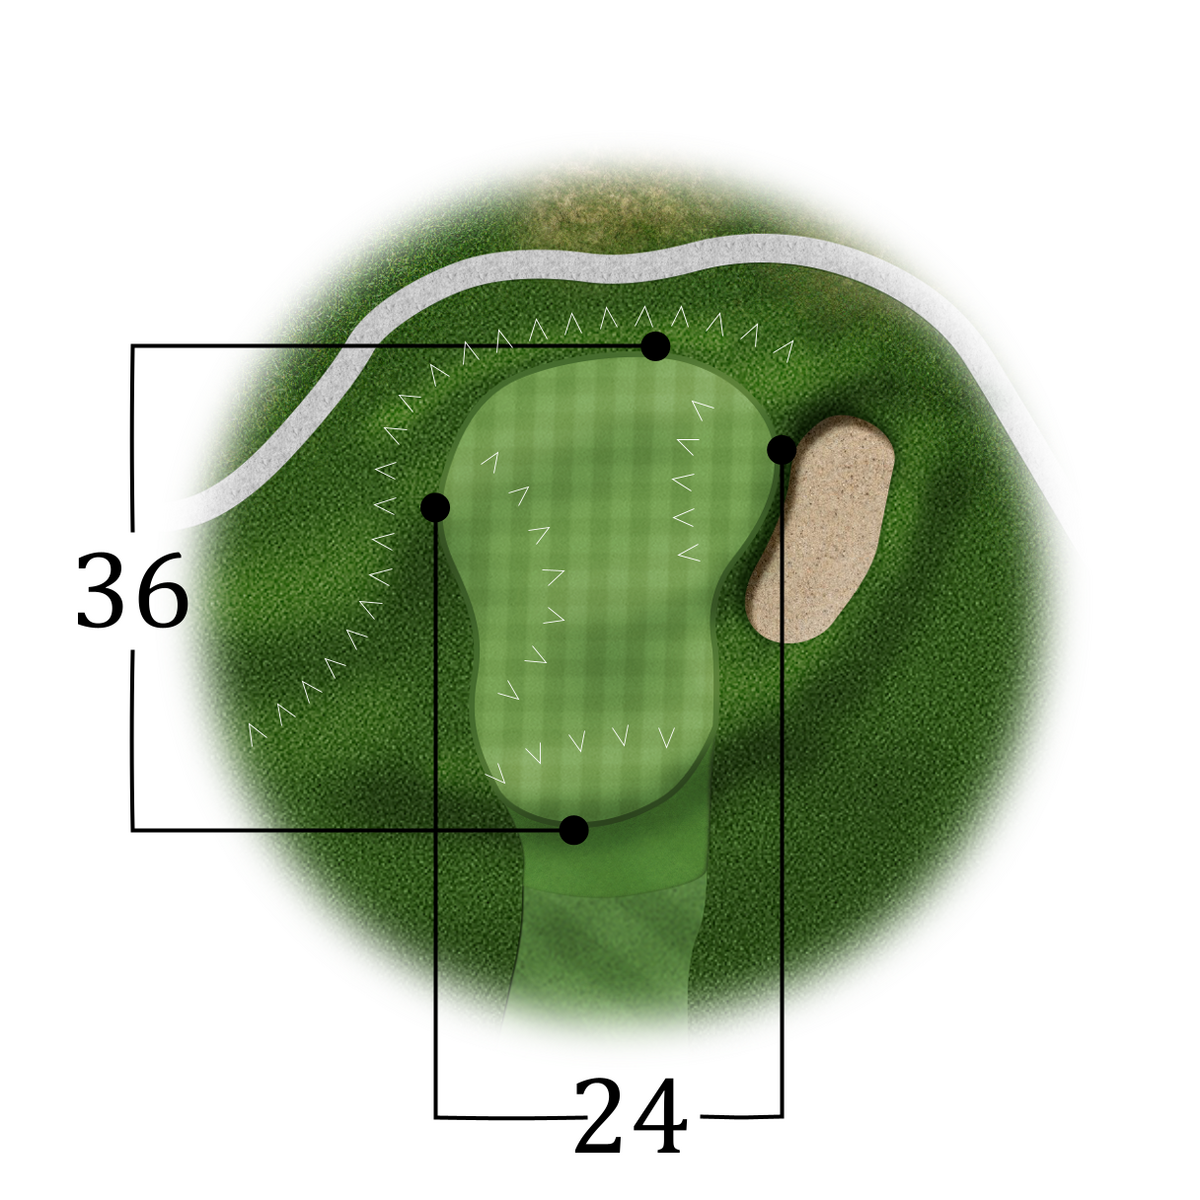
The fairway slopes strongly to the left on this PAR 4, ensuring that centrally placed tee shots roll to the left flat edge of the fairway. If you stop too far to the right, you risk being heavily under the ball on the second shot and having to overcome a few smaller trees. When hitting the very elongated green, the flag position should be taken into account, as it can take two club lengths more to avoid a long putt.
powered by:

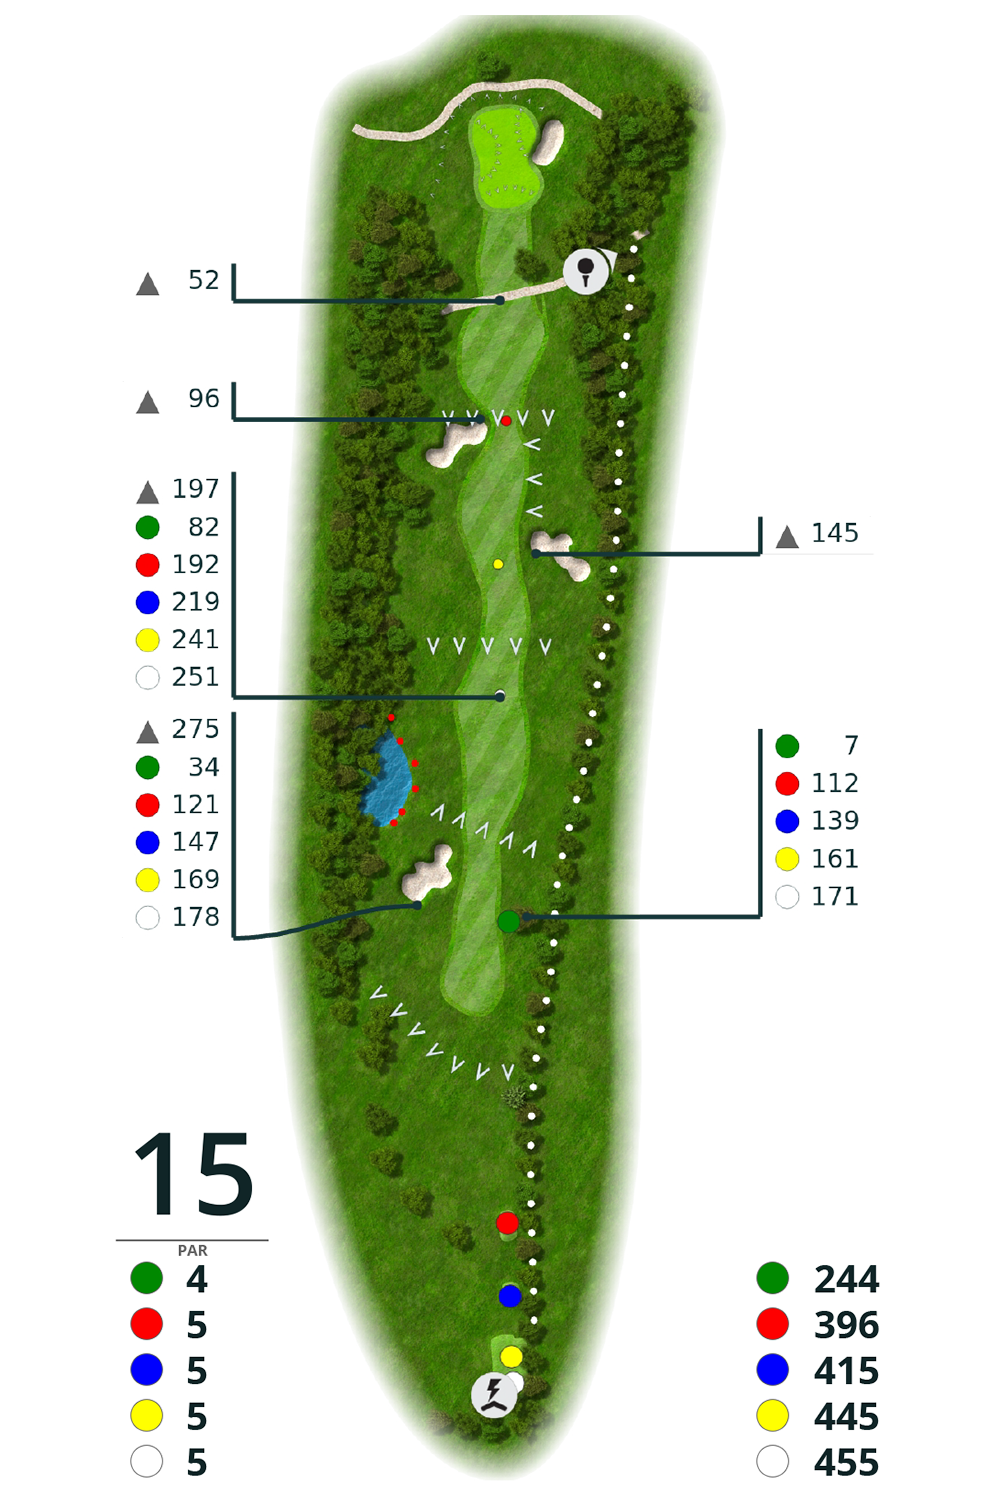
Hole 15
| Hole 15 | men | ladies | |
| white 455 m | PAR 5 | HCP 10 | |
| yellow 445 m | PAR 5 | HCP 10 | HCP 10 |
| blue 425 m | PAR 5 | HCP 10 | HCP 10 |
| red/orange 396 m | PAR 5 | HCP 4 | HCP 10 |
| green 244 m | PAR 4 |
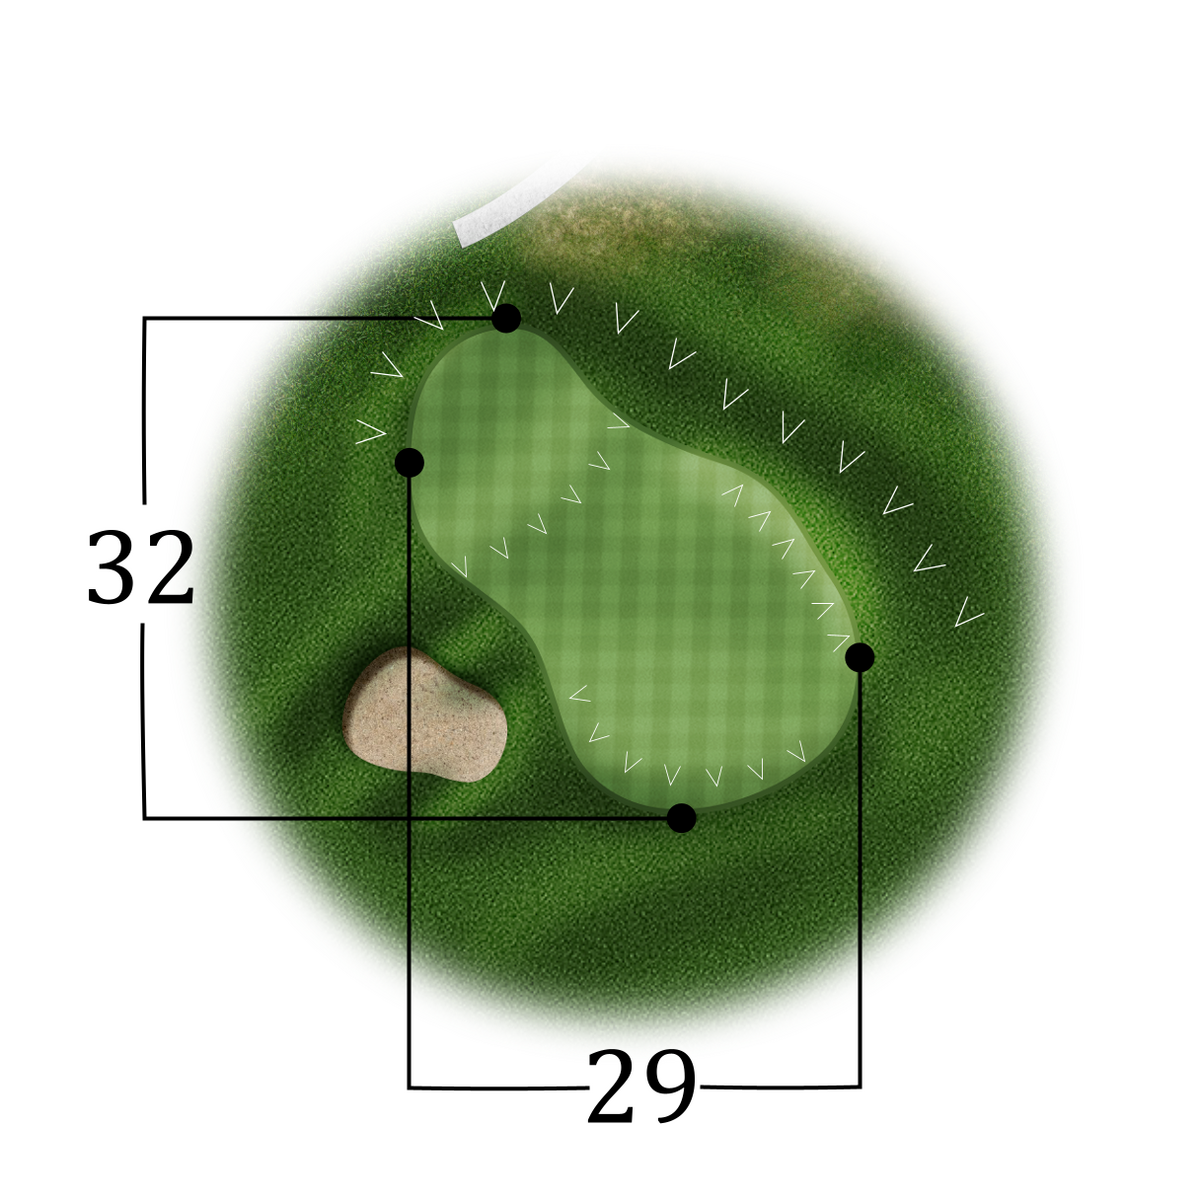
Both on the tee shot and on the second shot, this PAR 5 has bunkers waiting on the left and right of the fairway for balls that have come off the course. Some will be happy that they are there, as they prevent having to search for the ball in the water hazard or in bushes. Through a narrow alley it goes then on a strongly ondulierte green. Here, too, you should pay attention to the flag positions beforehand in order to avoid long putts that are difficult to assess.
Hole 16
| Hole 16 | men | ladies | |
| white 411 m | PAR 4 | HCP 2 | |
| yellow 428 m | PAR 5 | HCP 12 | HCP 12 |
| blue 418 m | PAR 5 | HCP 12 | HCP 12 |
| red 377 m | PAR 5 | HCP 6 | HCP 12 |
| green/orange 232 m | PAR 4 |
At the last PAR 5 on the course, one should not be deceived by the short length. The tee shot is in good hands in the dogleg turning to the right. The shot into the green is made difficult by three bunkers in front of it - no chance for balls rolling onto the green - and a water hazard behind it.


powered by:
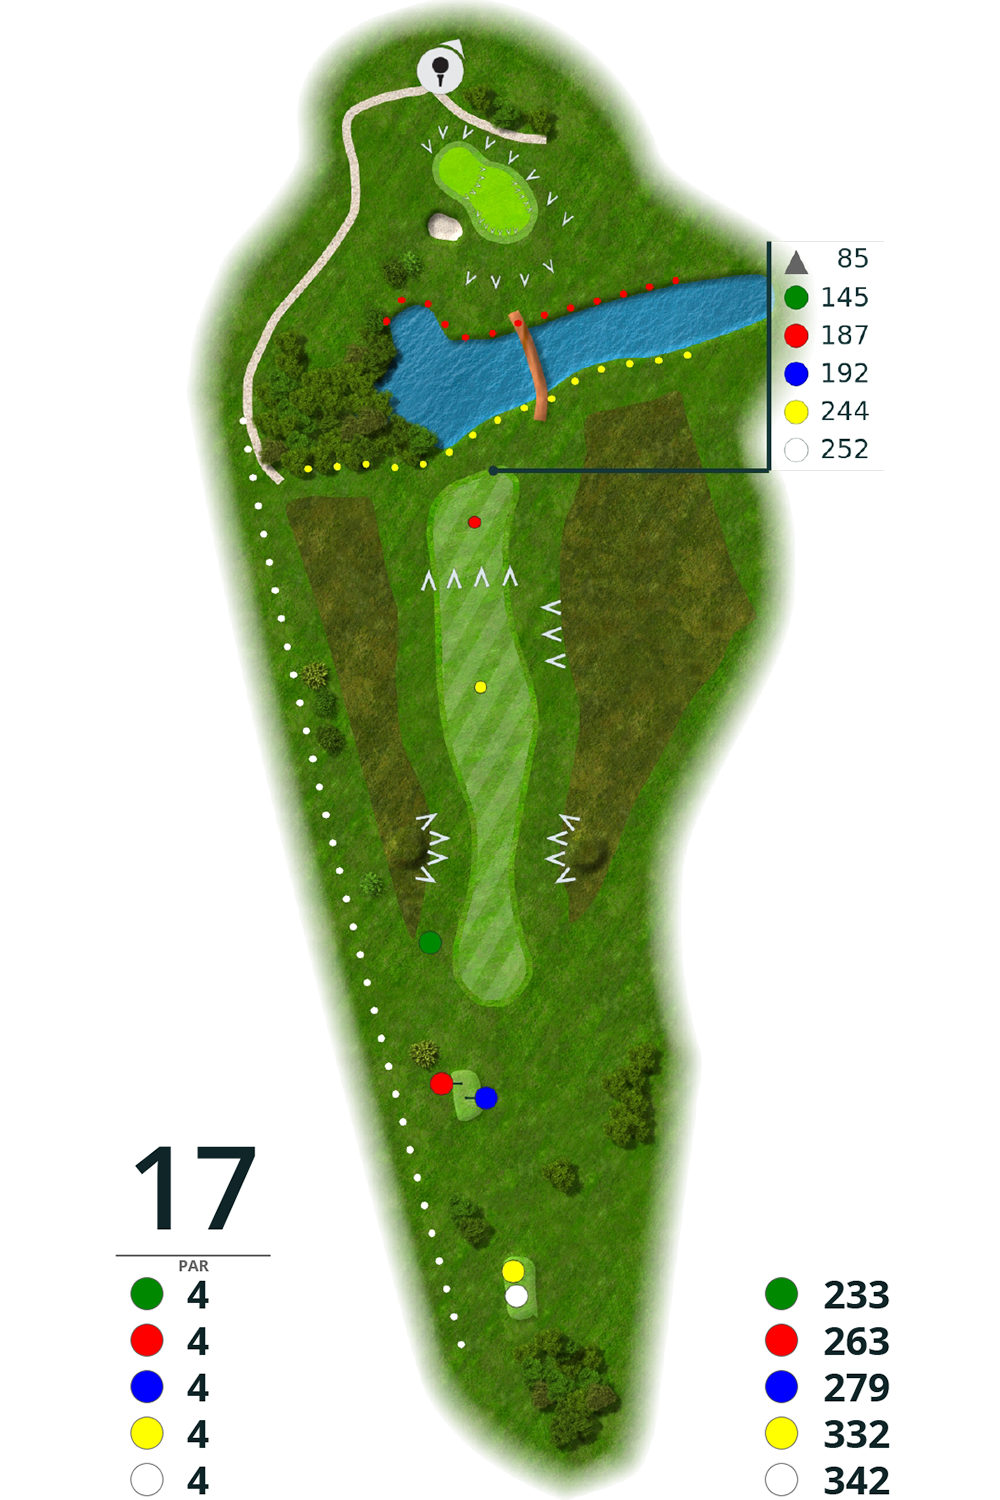
Hole 17
| Hole 17 | men | ladies | |
| white 342 m | PAR 4 | HCP 6 | |
| yellow 332 m | PAR 4 | HCP 2 | HCP 2 |
| blue 279 m | PAR 4 | HCP 2 | HCP 2 |
| red/orange 263 m | PAR 4 | HCP 10 | HCP 2 |
| green 233 m | PAR 4 |
Our 17th is completely different from the other holes. This PAR 4 has no obstacles to the left and right of the fairway - apart from gusts of wind. However, long hitters should think carefully about which club they use on the tee, because from the 100 m mark the fairway slopes down to a continuous water hazard. When hitting into the green, it is important to consider the height difference and the wind so as not to land on the slope or in the bunker on the left side.
powered by:

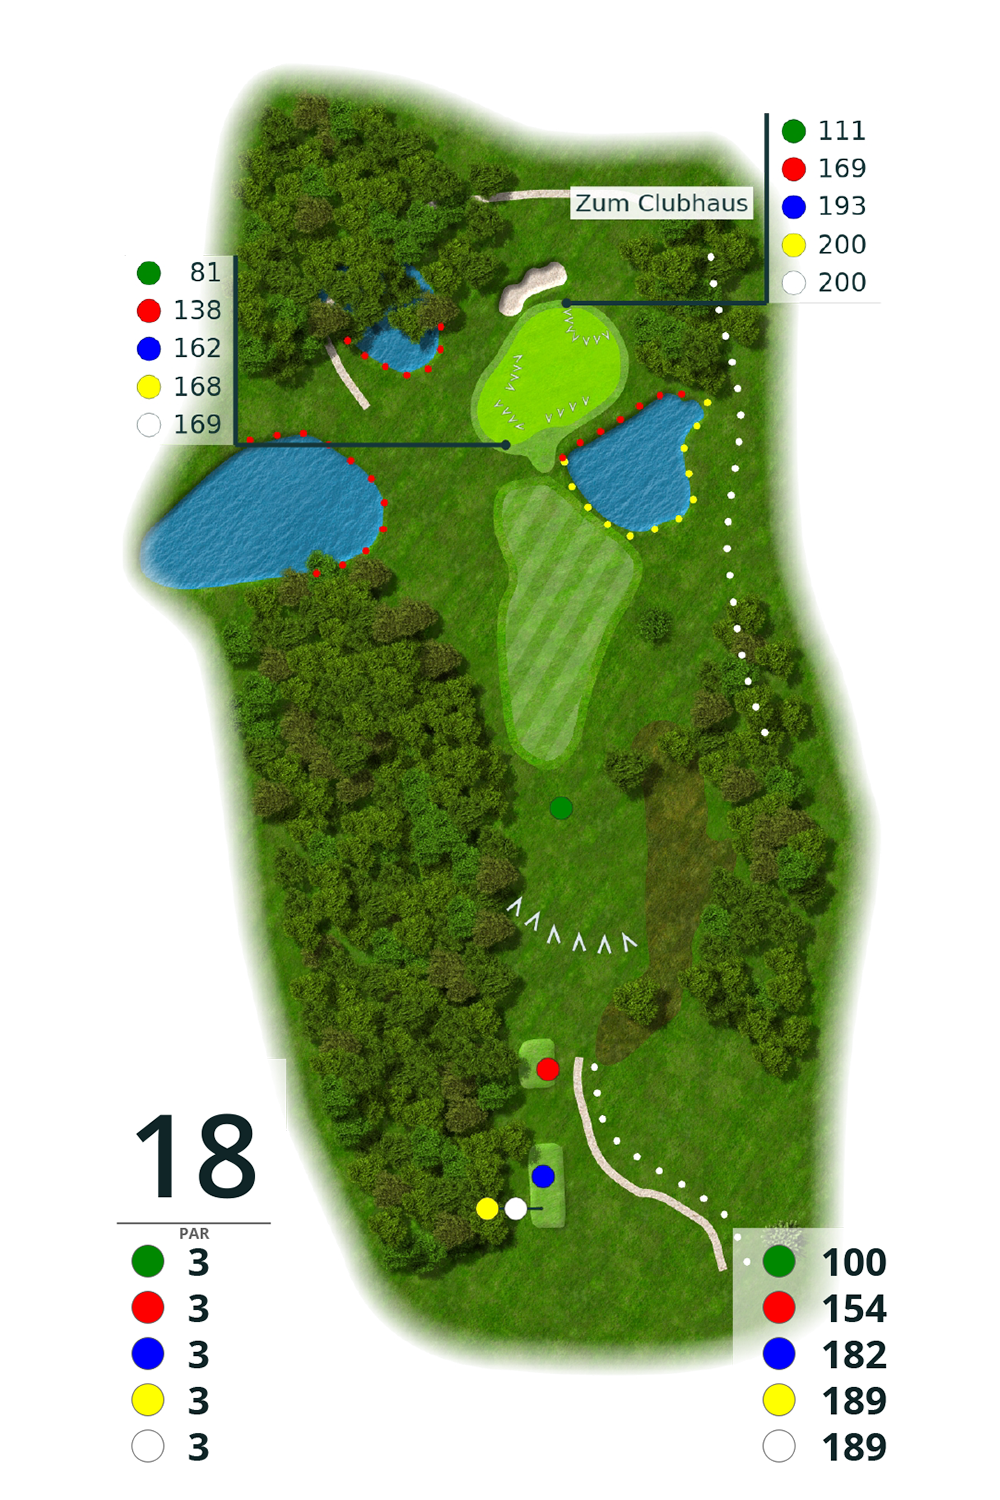
Hole 18
| Hole 18 | men | ladies | |
| white 189 m | PAR 3 | HCP 8 | |
| yellow 189 m | PAR 3 | HCP 8 | HCP 8 |
| blue 182 m | PAR 3 | HCP 8 | HCP 8 |
| red/orange 154 m | PAR 3 | HCP 12 | HCP 8 |
| green 100 m | PAR 3 |
And finally, a beautiful but challenging par 3. On the right side, the green is defended by a pond. On the left side there is enough space to place the tee shot and after a solid two-putt finish the round with a par.
 Ihre Privatsphäre ist uns wichtig